A decade ago, if you wanted to start a career as a software programmer/developer, you had to earn a bachelor’s degree in computer science, computer information systems, software engineering, or math. However today, you have many other options which will introduce you to the world of programming. Some of these ways include coding boot camps and training programs. One such program is the Python Backend Development Degree (24 weeks) being offered by German IT academy.
Backend programming is pertinent to website building and happens to be one of the most sought after and highly paid programming skill. German IT academy is teaching all about it in just 24 weeks whereas you might spend 4 years in an educational institute learning half the things and paying 10x more. Let’s look into the details to determine its suitability and demand in contemporary job market.
Is a training program/online degree worth it?
Nowadays, it is more important to have skills than a degree. Skill is what made Mark Zuckerberg and Steve jobs, not college degrees. Also;
What’s great about programming is that you can acquire this skill at any stage in your life.
This idea is also appealing if you do not want to waste four years of your life learning half the things you would have no use for. A quick way to fulfill your programming aspirations is to become a backend developer. There are many kinds of programmers, but backend developers are some of the most sought after experts in their fields.
It’s also important here to mention that an educational degree has credence of its own and we are not in any way discouraging the students from studying in 4 years degree programs. It’s all about what suits you depending on your budget and goals.
Why go for Python Backend Development Degree?
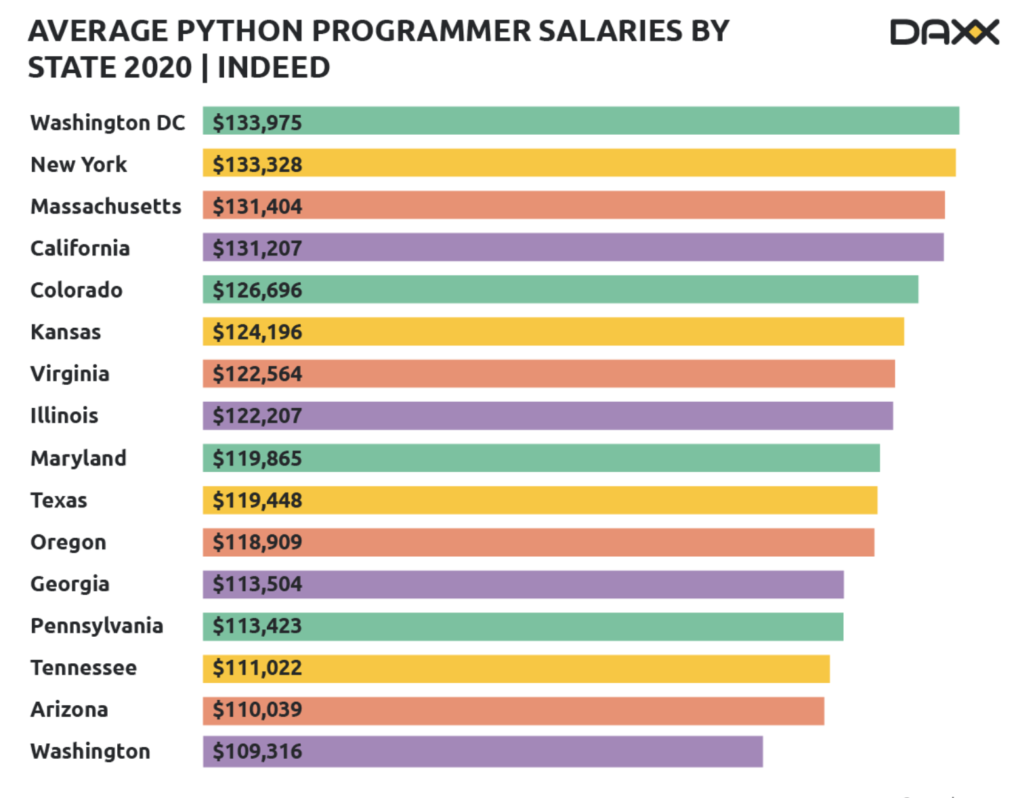
A backend developer can easily make up to $133,975 annually and it is something that you can easily do in the comfort of your home, in an office, or as a freelancer who is continents apart from his or her client. Are you intrigued and want to learn more about being a backend developer. Here are some things that you should know.
If working remotely, you can achieve pretty impressing salaries.
What is Backend Development?
Backend development is what keeps the internet running in background. Backend developers mostly focus on how a website should work. They write code for the functionality and logic powering the application that are running on user end, and the main coding they work on is never seen by users. Backend Engineers can be found across industries, helping to build websites using advanced technologies for all kind of companies. The technology of back end is a combination of applications, servers and databases.
Websites on internet are based on thousands of lines of code that is based on computer languages. Just like we understand a specific language, to design applications programmers have to write that code which tells the computer what to do, how to make a specific website look, work and interact with a user.
German IT academy
German IT academy is offering online courses for students in the field of programing and information technology. The courses are very detailed and promise to impart the related skill quite proficiently. Another important thing about these courses is the minimal price at which they are being offered. All these factors make the academy a viable place for learning the important skills that can help you earn handsomely from the comfort of your home. Now, the academy is offering its new online course with great demand.
Python Backend Development Degree
German IT Academy is launching a new Product „Backend Developer Degree 24weeks“. The reason that most of the students are so much interested in this program is that Backend developers are in great demand in today’s era of information and technology. We are surrounded by web and backend development is inevitable to keep it running. This makes it a great skill with annual earnings up to $133,975 and that too with a balanced life where you work at your disposal without any stress.
The Python Backend Development Degree comprises of all the essentials you need in order to become a successful backend developer. With the basic language Python 3, you can also expect to learn some of the Linux basics as well while also touching on REST APIs and Python Frameworks. Our Backend Developer Degree offers you to learn backend development language which basically work on the background of many web applications and websites. The work you will learn actually allows the web to connect to databases, power web applications, manage user connections and much more.
What we will teach you?
Let’s get to the nitty gritty of the 24 weeks degree and open it up for our students to let them have a better idea of what’s on the offer and why they should take it. Here are some of the things that you will learn with us as a backend developer:
1. The language Python 3
Python 3 is widely used for artificial intelligence, with packages for several application fields including Machine Learning, Natural Language Processing and Data Science. As a programmer, it will elevate your programming skills and help you understand basics more.
2. PostgreSQL and NoSQL Databases
These are some of the most commonly used databases that you will come across and need to understand. The program encompasses a brief introduction of these databases to make the students familiar with their working and use in backend programming.
3. Creating Rest APIs
Rest APIs are part of web infrastructure and as a programmer it is significant that you have command over this particular subject.
4. Python Frameworks; Django and Flask
This is an old age debate about which framework is better. Every programmer has a preference, but if you want to be a backend developer, it is important to understand both. So, we will teach you both.
5. Linux and Clouds
Linux provides a more free hand to programmers than windows. Learning the basics of Linux and Cloud Services like Google Cloud or AWS are essential for a programmer.
6. Creating Simple Websites
It is the bread and butter of any programmer, especially the beginners. Learning how to make simple websites, using host sites, and website builders are some of the essential skills you should learn. We believe in imparting money making skills, so you can learn this handy skill in the program as well.
7. Learning Git
Git is a distributed version-control system for tracking changes in source code during software development. It is designed for coordinating work among programmers, but it can be used to track changes in any set of files. Its goals include speed, data integrity, and support for distributed, non-linear workflows.
Why online learning is for you?
Students faced with the challenge of balancing work, family, and education, may find that an online degree is an ideal solution for them. Further, pursuing an online degree can prepare students for career advancement and showcase their key skills to potential employers. Also, Covid-19 will displace a lot of programmers from office into their homes. So working and studying from home should a no-brainer from now on. Your Python Backend Developer Degree will be a nice side effect after the lockdown ends.
Self-Paced Learning
Self-paced learning differs from the traditional class lessons. The self-paced method allows students to design their own learning experience, not only at their comfort level, but according to their own interests and learning preferences. The role of the instructor is to provide guidance, feedback on proficiency and tailor the learning environment to students‘ needs. We will teach you to become better learners on your own under our guidance.
Time Management
Time management is important because it helps you control your workday. Control allows you to build your business or perform your job without compromising your work-life balance. Better time management improves your performance and work output. You will get work done on time, boost your own confidence and improve career opportunities.
Virtual Communication and Collaboration
Virtual Communication will also boost when you will participate in discussion boards with your class fellows, communicate with instructor and collaborate through various soft wares. The abundance of different tools (Zoom, MS Teams, … ) make this process frictionless.
Self-Motivation with Python Backend Development Degree
By earning an online degree, you can prove that you are able to tackle multiple tasks, set priorities, and adapt to changing in every work conditions. This skill is among the top 10 employability skills employers want to see in new hires and is essential for a backend developer.
Critical-thinking Skills
Critical thinking plays an important role in any type of education or a job. Online learning forces you to develop your critical thinking skills in different ways that you might not have experienced before. This sort of self-paced and self-motivated learning develops critical thinking skills. A creative programmer will become a backend developer who is always in demand. In this field, your work speaks for itself.
What it will cost you?
The students are apprehensive of the costs of online programs and believe that these are always overpriced. German IT academy has solved the problem. The Python Backend Development Degree will cost you between $54 and 60$ per month (depending on your payment plan). It’s a 6 months long course which you can easily do in comfort of your home and by paying a minimal amount which is nominal in comparison to the money making skills it impart.
The next question can be about the quality of online teaching and students can have concerns about it because of the low price. We assure you that you’ll find the program to be one of its kind and the level of teaching is unmatched by any of the competitive programs. The online certificate is also recognized well by many industries and institutes. It is inexpensive yet the best because we believe in empowering our students with the finest of skills and in helping them achieve their dreams.
The novel Coronavirus has provided a stimulus to the online learning. Researches from all over the world show that more and more businesses and educational institutions are embracing online teaching and learning. In such unexpected times, the role of LMS (Learning Management System) has become more critical than ever. That is why the demand of Moodle, an open-source software, has witnessed manifold increase since the last few months. Its robust, secure, and integrated system has helped businesses and universities to continue discharging essential services.
It is pertinent to mention that Moodle was most widely open-source LMS even before the pandemic because of its learning-centric tools, and tremendous compatibility with businesses and educational institutions of all nature, however, since early 2020, it has collaborated with global academic, and business stakeholders to foster online learning objectives. It would not be wrong to say that Moodle is the future of online teaching and learning and the quicker your organization embraces this online learning platform, the better it will be. The below paragraphs will validate this notion.
Moodle, developed by Martin Dougiamas in 2002, is an open-source Learning Management Systemthat is designed to provide an effective online learning platform to educators, businesses, and administrators. Being the most popular LMS, Moodle ensures a robust, integrated, interoperable, and highly-functional system to create personalized and private learning environments. Moodle has been adopted by all levels of educational institutions, businesses, non-profit organizations, and other community systems of all nature because of its tremendous scalability, and adaptability. It helps businesses to create a collaborative learning space that stimulates both learning and teaching.
Why Educational Institutions Need Moodle
Moodle is used by more than 60% of educational institutions in over 180 languages and dialects all across the world. It helps teachers, and educators to create quality online classrooms to improve the learning outcomes for students. This System fosters online learning objectives of your organization because:
Inexpensive
It is an open-source software which means it is free to download, customize, and use according to your requirements. It is a perfect solution for organizations having budgetary constraints. Having customer support from more than 80 certified Moodle Partners, you can better customize the performance of the Moodle site. So, anyone can use it for both commercial and non-commercial online teaching and learning.
Moodle is Scalable and Flexibility
The best thing about Moodle is that it provides a highly flexible learning environment for your organization, be it small or large. Since it is an open-source software, it can easily be customized to individual needs. It uses free plugins to integrate external applications to achieve specific goals and functionalities. It can be scaled to support the requirements of a few to millions of students in small, and large educational institutions.
Enhanced Security and Privacy
Many people have the misconception that Moodle is less secure software compared to its closed-source alternatives. But in reality, it is a highly secure and private platform with regular security updates by developers to ensure users‘ data security and privacy, and provide multiple-tier protection against data loss, misuse, and unauthorized access. Moreover, if you want complete control, you can easily deploy Moodle on any private secure cloud or server.
Accessibility and Compatibility
Moodle is specifically designed to help all learners access it from anywhere. Its default mobile-compatible interface and cross-browser compatibility, it can be accessed from many web browsers, and devices.
Up-to-Date and Future Proof
Having support from over 80 certified Moodle Partners, it is regularly reviewed, updated and customized to meet the evolving needs of educators. Similarly, you can secure your investment by integrating the LMS with other digital tools, and technologies to create an effective and interoperable online learning ecosystem.
In short, Moodle offers an all-in-one learning platform to enhance the learning outcomes of educational institutions. From quizzes, online exams, and live discussions to online grading, Moodle has become the standard online platform for over 1/3rd of the universities and countless schools and colleges across the world.
Why Business Organizations Need Moodle LMS?
The role of Moodle in improving the efficiency of workplaces cannot be over-emphasized. It can help your business grow in a myriad of ways.
Starting from employee onboarding, Moodle helps to create a perfect virtual workplace to hire new workers, train them, and help them understand policies, procedures, and culture of your organization in the simplest possible way. This methodology offers significant cost savings.
Similarly, Moodle helps to enhance the development and retention of employees. You can use this platform to design courses that will help to better train and evaluate your employees and keep them up-to-date with market trends. At the end of the day, it will greatly help you optimize your company, boost sales, gain more revenue, and expand the reach of your products.
Likewise, Moodle cloud-based service offers 24/7 availability and accessibility to learning. In the light of prevalent pandemic, it is the best option to allows all the employees to learn from a single platform while sitting at homes. This single-source learning provides a centralized, coherent training, and evaluation mechanism for your organization to better respond to the challenges of today and tomorrow.
Final Remarks
In a nutshell, Moodle has become a standard learning platform for hundreds of thousands of educators and businesses. Its extraordinary adaptability to all types of educational and business environments makes it the best open source LMS software in the world. Hence, it can help your organization achieve the set objectives in this digital era of cut-throat competition.
Laravel is a powerful MVC PHP framework. From official docs „Laravel is a web application framework with expressive, elegant syntax“. You must’ve heard about Laravel if you’ve ever worked with PHP. Laravel has experienced major growth since it’s initial release in 2011. Laravel was created by Taylor Otwell. It became the most starred PHP framework on GitHub in 2015.
My goal with this article is to create a guide for those who just want to learn Laravel and explore PHP. This article will not cover every small detail about Laravel but will be enough to get you started with Laravel 6.
Prerequisites
You should be familiar with HTML, CSS & most important Object-Oriented programming with PHP 7
A local PHP environment (Valet, Homestead, Vagrant, XAMP, LAMP, etc.)
A database (MySQL, SQLite etc.)
Composer
Node & NPM installed and updated
Note: For local environment I’ll be using LAMP (Linux Apache MySQL PHP) as there are no pre-configured environment like Homestead or Valet available for Linux. You can use Homestead for windows or Valet if you’re a Mac user.
I’ll explain how to create a new Laravel 6 application just as I would in real world environment. So let’s get started.
Planning
You must plan any project before coding it out. Planning a project before implementation is a major factor in its success. It doesn’t matter how you plan a project. You can plan it on Paper, whiteboard or some simple text file. You can also use Trello for planning out all the components you’re going to create in the project.
Today, we are going to create a Contact Book app. So let’s talk about goals of it.
Display all contacts in a list.
Create a form where people can add new contact.
Validate the form.
Insert the data into the database.
Get Started
Let’s create a brand-new Laravel project. I like to put all my projects in Development directory. Open your terminal and navigate to this directory.
mkdir Development
cd Development
Next, let’s install Laravel’s command line installer.
composer global require "laravel/installer"
Now, create a new Laravel project.
laravel new ContactBook
This will create a new directory at Development/ContactBook and install a stock Laravel app.
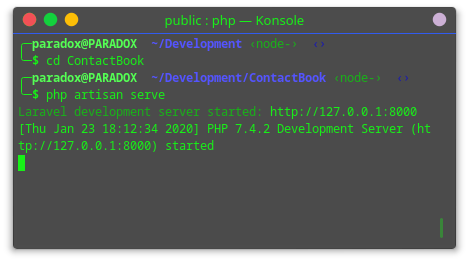
Navigate to newly created directory and run Laravel server by
cd ContactBook
php artisan serve
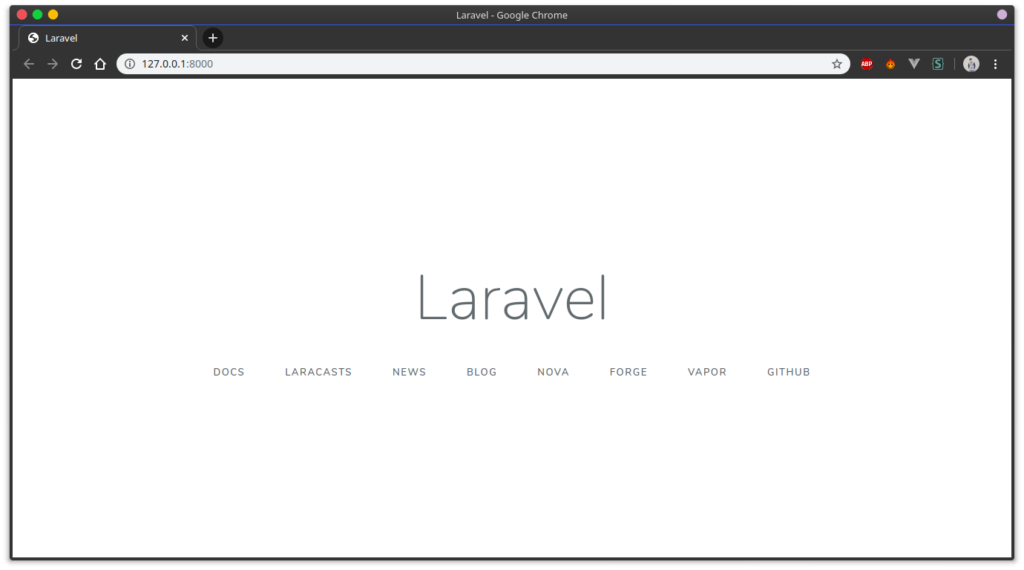
You’ll get this output, open your browser and navigate to given address.
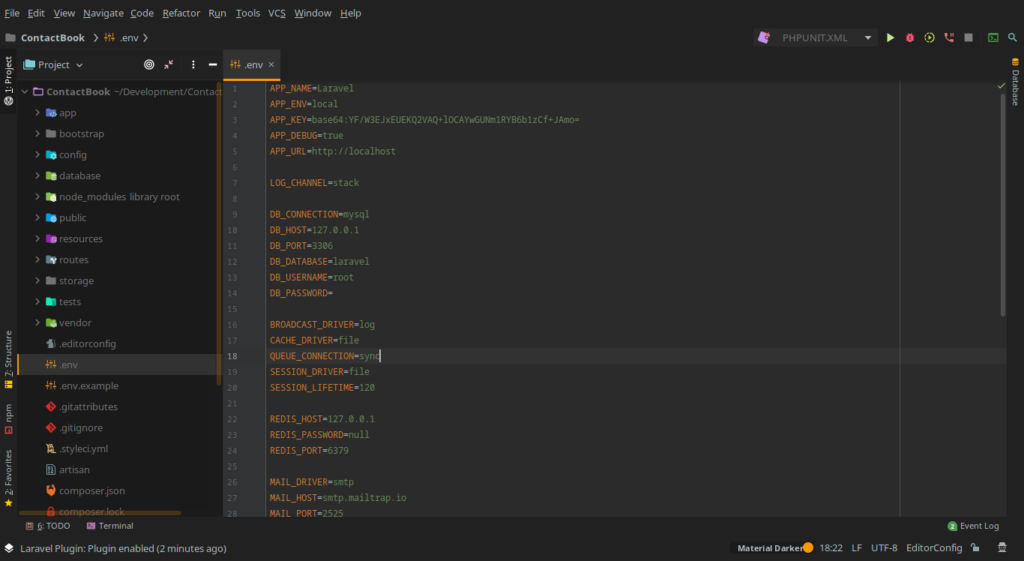
Let’s open this newly created project in Editor. You can use any editor or IDE of your choice. My personal favorite IDE for Laravel development is PhpStorm. Now open .env (Environment) file.
Laravel environment file
Here, you can set different environment variables. You can change the name of the app by editing ‚APP_NAME‘. The main part here is ‚DB_*‘ variables. You can set different database by specifying driver name. Here you can also set SMTP details.
Setting up Authentication
Laravel made it very easy to enable Login/Registration functionality. In this tutorial, it’s not mandatory to set up authentication, so you can skip this part if you want to.
Laravel’s laravel/ui package provides a quick way to scaffold all the routes and views you need for authentication using a few simple commands:
composer require laravel/ui --dev
php artisan ui bootstrap --auth
npm install && npm run dev
This command will install a layout view, registration and login views, as well as routes for all authentication end-points. A HomeController will also be generated to handle post-login requests to your application’s dashboard.
With the basics set up and working, it’s time to start doing some coding.
Building a Contact List
Building a whole finished project is quite overwhelming, so it’s better if we divide our project in small parts. So let’s start with displaying a list of contacts. It may sound a small task but it still requires a database, table, view and query.
So let’s create a migration. We can create a migration by using Laravel artisan command line tool.
Save it and run the migration by using following command.
php artisan migrate
Now, we’re going to need a model and some dummy data to work with our database. Laravel provides database seeder to populate table with dummy data and a factory class to generate dummy data.
php artisan make:model --factory ContactBook
This command will create a new Contact model. The --factory flag will generate a new factory file. Our newly created factory file will reside in database/factories. Open the ContactFactory.php file and fill the following:
This command will create a new seeder for our contact book table. Open the seeder file by going to database/seeds/ContactBookTableSeeder.php. Now paste the following in it.
 public function run()
 {
     factory(App\ContactBook::class, 5)->create();
 }
To activate the following, navigate to database/seeds/DatabaseSeeder.php. Now paste the following in it.
public function run()
{
     $this->call(ContactBookTableSeeder::class);
}
Now, run the migration and seed the tables by running the following command.
php artisan migrate:fresh --seed
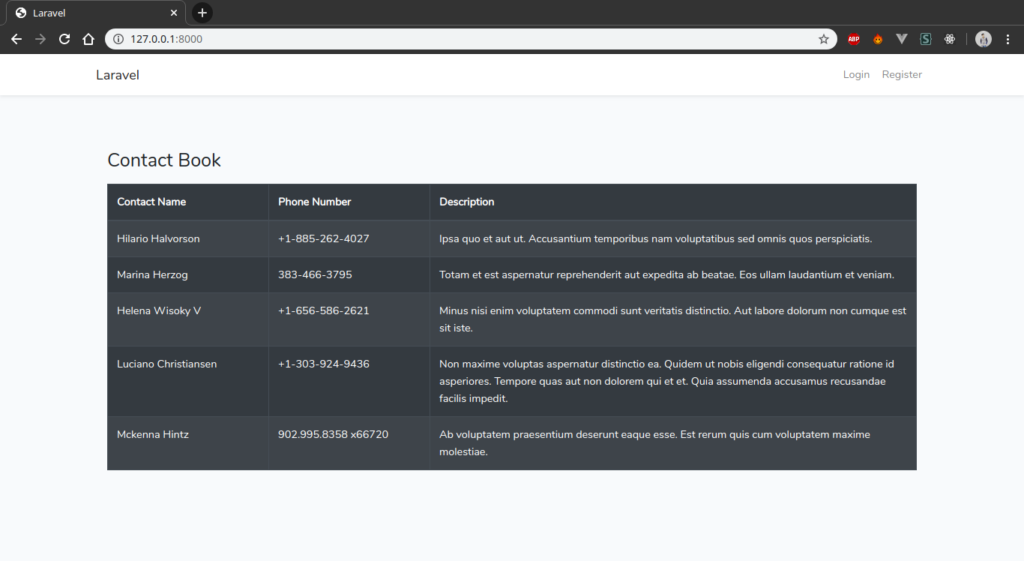
We have successfully generated fake data for our app! Now we’re ready to create a new view to display a list of Contacts.
Routes & Views
Now it’s time to provide new routes to display a form to add new contact and list existing contacts. We can add new routes to our application in the routes/web.php file.
Here, we can create necessary routes for our app. Laravel provides a default route. To create a new route, we can either use dedicated controller class or closure. For sake of simplicity we’re going to use closure in our app.
Now, let’s update the home route to show all contacts from database table.
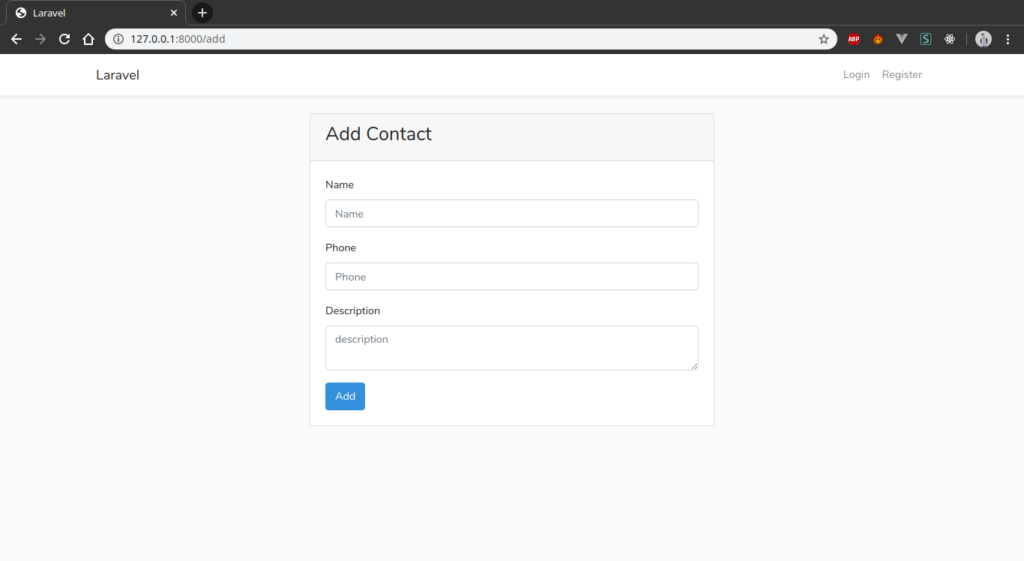
This will create a new form with 3 fields, name, phone and description. The form action is ‚/insert‘ which we will next. Laravel require to send a csrf token with any type of form submission, so we’ve also included @csrf. This will create a hidden field with a random csrf token.
Navigate to ‚/add‘ in your browser, you’ll see something like this.
Handling form submission
Now, with the form is created we can start working on our insert route, to handle the form submission. Open routes file and add the following.
This route is a little complicated than others so let’s walk through it.
First, we are injecting the Illuminate\Http\Request object, which holds the POST data and other data about the request.
Next, we use the request’s validate() method to validate the form data. The validated fields are returned to the $data variable, and we can use them to populate our model.
We require all three fields, and using the pipe character; we can define multiple rules. If validation fails, an exception is thrown, and the route returns the user with the original input data and validation errors.
Next, we use the tap() helper function to create a new ContactBook model instance and then save it. Using tap allows us to call save() and still return the model instance after the save.
Now allow our model to populate given data, we’ve to specify „fillable“ properties. Open ContactBook model and add the following.
class ContactBook extends Model
{
    protected $fillable = [
        'name',
        'phone',
        'description'
    ];
}
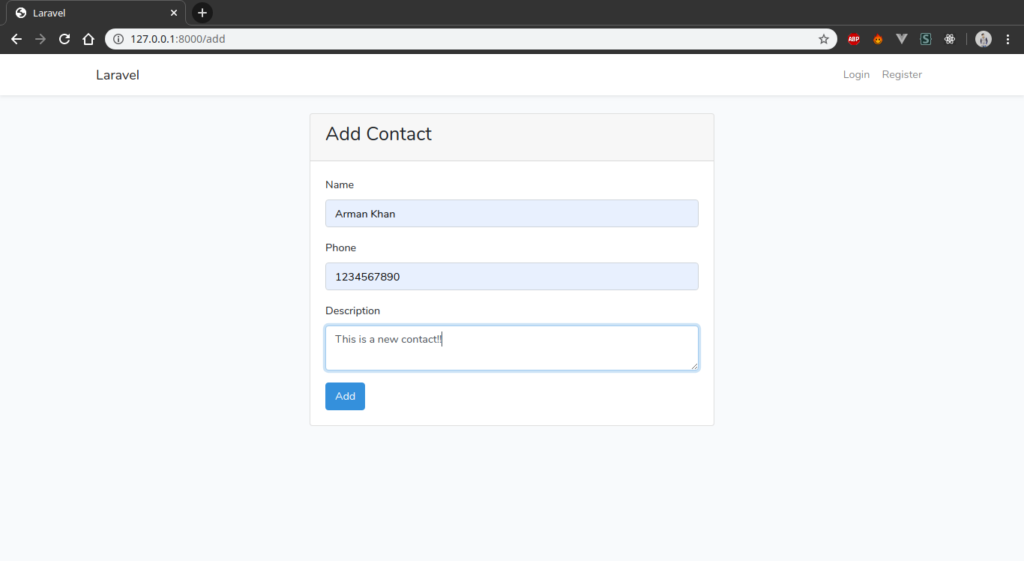
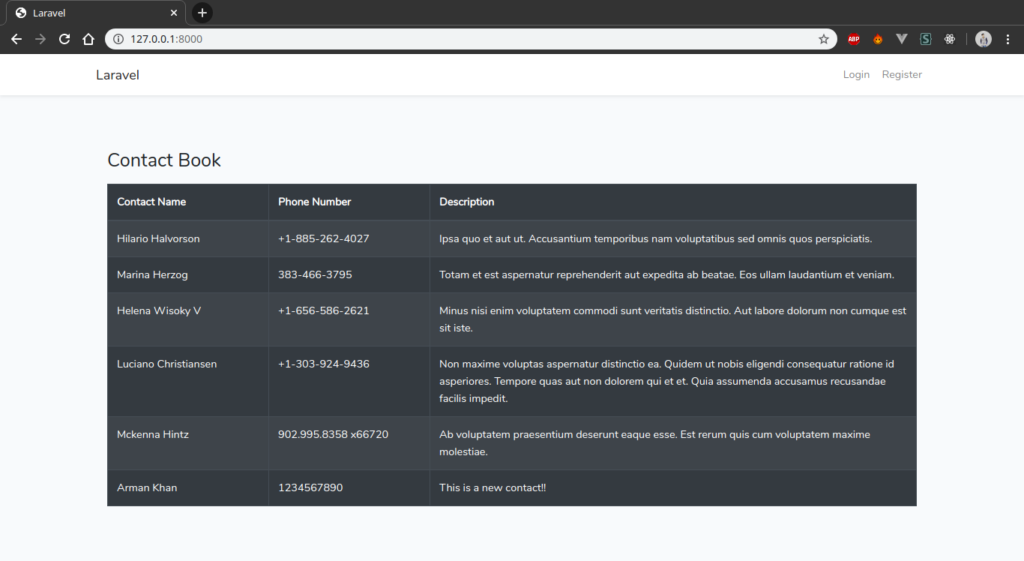
Now, let’s test this in our browser. Navigate to /add and submit the form with proper data.
Filling data in form
Our New Contact added to the bottom of the contact list
Conclusion
Congratulations, you’ve created your first Laravel 6 app. This article was designed to get you started on building your app, and you can use this as a building block to gain the skills you need to develop your application.
I hope you liked this article. Subscribe to our mailing list for more articles by me. Have a great day!
Have you been wondering how to build a web application? Perhaps you have started to learn programming languages but realizing that you had so much to climb the mountain and end up giving up. Or maybe you have been developing websites but it has been hard for you to maintain, keep track or upgrade your web application. In this article, we will learn about ruby on rails and the reasons behind using it as your backend development framework. I will also show you how to setup Ruby on Rails development environment and create a simple todo list application in few minutes with Ruby on Rails.
Getting to know Ruby on Rails
So let us address Ruby for a while before we go deep into this topic. Ruby is a programming language that was developed by Yukihiro Matsumoto from Japan in 1995. The idea of Ruby programming language is to put human need above computer needs, that is why Ruby is an object-oriented yet easy-to-use scripting language.
Okay, now we have a bit of history about Ruby programming language so let us talk ruby gems. Wait don’t get confessed yet, I am not talking about “a pink to blood-red colored gemstone”. What I talking about it is “a package manager for the Ruby programming language that provides a standard format for distributing Ruby programs and libraries, a tool designed to easily manage the installation of gems, and a server for distributing them” that is conveniently named RubyGems.
Alright, let’s take a breather…
Since we know that Ruby is a “human-friendly” programming language creating RubyGems was essential to making the language more powerful for a longer time.
Okay, know most probably you are wondering so what is it about Rails then?
In simple words, Rails is one of RubyGems. Rails is just a package that enables Ruby to run a webserver. So what is so special about it you might ask.
Rails
To begin with, Rails gem is not “only a package” but it is an entire framework for web development. Rails framework is built with the developers are in mind to keep the process of development as easy as it should be. It also has an easy learning curve compared to other frameworks.
Oh boy, we are going into a bit of detail here but don’t worry it will all make sense eventually.
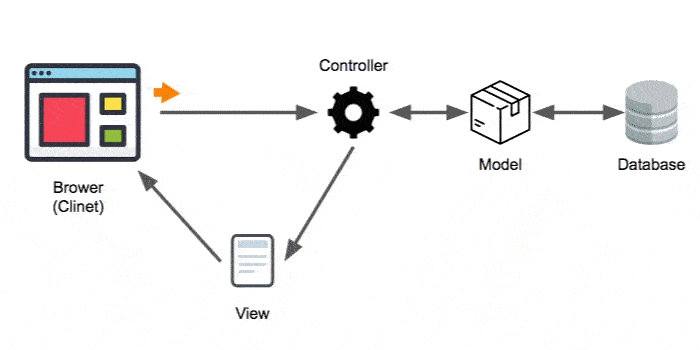
Let start with, “Rails is a model-view-controller (MVC)” framework.
Wait hold your horses… “MVC” what is this a channel name, something like MTV?
Well, that would be awesome, but I am sorry; it is not a channel name.
“MVC is an architectural pattern that separates an application into three main logical components. Each of these components are built to handle specific development aspects for an application” -wiki
Sound complicated? Not really. Here how Rails MVC works:
Model: is Responsible for storing and retrieving data
View: is Responsible for the rendering of the model (User interface)
Controller: is Responsible for responding to user input and instructing the model to respond to the user input
A simple animated illustration is shown on how Rails MVC work is shown below:
Ruby on Rails Model-View-Controller (MVC)
Reasons why
Why Rails? Well, I will give you the reasons and you can be the judge of “why not rails?”
1. The process of development is much faster
Due to the object-oriented nature of Ruby and the enormous collection of open source code available within the Rails community, Rails development process is much faster compare to other programming languages.
2. Developers find it easy to move between different Rails projects
As developers working in many projects, keeping track of what different project code doing could be hard. But not in rails because of each project your create uses the same structure and coding practices.
3. Rails is good for rapid application development (RAD)
Because it is easy to accommodate changes, Rails is a great framework for rapid application development; were RAD is a methodology that prioritizes fast prototype releases and repetitions.
4. Ruby code is „humanize code“ and mostly self-documenting
Because Rails is build using Ruby, it takes advantage of ruby’s readability. which makes rails easy to pick up by other developers with code that has less documentation.
5. Develops a strong focus on testing
Rails have a strong testing framework that can test your application before deployment and helps developers find bugs or security threads.
6. Open source code
There are no licensing costs associated. Since Rails libraries are mostly open-source it is free to use for commercial uses, unlike other frameworks that have paid licensing.
Common concerns about ruby on rails
1. Hosts support for Rails
The support of hosting companies for Ruby on rails is not common. Comparing to PHP, javascript, Java, and C to Ruby, Ruby is a slow programming language. But it should not be a deal-breaker. With hosting providers like Heroku and EngineYard, you can deploy your application for the world to see in minutes.
2. Performance and Scalability
Rails applications are not as fast as Java or C, which is true. it does not stop big companies to rely on Rails as their primary framework. Big companies such as Airbnb, Twitch, Kickstarter and many more. The majority of applications developed by Rails are fast enough. Although Ruby on Rails is not the fastest programming language.
Ruby on Rails Development Environment setup
Setup on Mac/Linux machines
Installing homebrew (MAC/Linux)
Start by installing homebrew in your mac machine. To do so you have to run the following command in your terminal:
Now that we have Homebrew installed, we can use it to install Ruby.
We’re going to use rbenv to install and manage our Ruby versions.
To do this, run the following commands in your Terminal:
brew install rbenv ruby-build

# Add rbenv to bash so that it loads every time you open a terminal
echo 'if which rbenv > /dev/null; then eval "$(rbenv init -)"; fi' >> ~/.zshrc
source ~/.zshrc

# Install Ruby
rbenv install 2.7.0
rbenv global 2.7.0
ruby -v
Installing Rails (MAC/Linux)
Installing Rails is as simple as running the following command in your terminal:
gem install rails -v 6.0.2.1
Rails is now installed, but in order for us to use the rails executable, we need to tell rbenv to see it:
rbenv rehash
And now we can verify Rails is installed:
rails -v
# Rails 6.0.2.1
Setting Up A Database for macOS Searia
Rails ships with sqlite3 as the default database. Chances are you won’t want to use it because it’s stored as a simple file on disk. You’ll probably want something more robust like MySQL or PostgreSQL; but for our purposes, we will only need a simple setup to get started.
Because we can’t use the built-in sqlite3 version with macOS Sierra without running into some troubles, we’re going to install from homebrew.
brew install sqlite3
Setup on Windows machines
Installing Ruby (Windows)
To install Ruby for windows, you can go download the ruby installer and install it like any other application
Once you installed ruby go ahead and open the command prompt. to confirm ruby successfully installation you can type the following command
ruby -v
Installing Rails (Window)
After installing ruby you can open the command prompt and type the following to install Rails
gem install rails
once you installed Rails, you can verify by typing the following:
rails -v
and that should be it for windows users, lucky you windows user!
Creating your first Rails Application
Generate Rails Application Files
After installing Ruby on Rails we can start with creating a simple application to see how fast and easy it is to make solid applications using Rails. open your terminal/command line then navigate to where you want to create your project using cd command for example cd Desktop/
to create a new rails project you can type the following command:
rails new <name_of_your_project>
For our example, we are going to make a simple todo list application so if you want to follow along with type the following code instead:
rails new todolistapp
Creating a Database for Your Rails Appliaction
Then press enter and wait for the magic to happen. once rails finish generating your todo application you have to navigate to the newly created project folder:
cd todolistapp
then run the following code to create the database for your application
rake db:create
Starting Rails Server
once created the database try to run the rails server by typing
rails s
or
rails server
After run the rails server you can open a new browser window and load http://localhost:3000/ to view your newly created rails application.
Using rails scaffold to create a simple todo list application
Okay, you have come through so far. now we have a todo list app created and our server is loading the rails default page.
will now let us make it our own and change it to our needs.
let us list down the „todo list“ for our todo list app: (sound funny when you put it this way) anyhow here:
database table for the todo list app.
model to update the database.
views to display the model data.
a controller that takes the user input and sends back view.
doesn’t that sound a lot todo? Well, it is a lot to do for creating a simple app like this! But not with Rails.
you can use two commands to do all of this for you.
Generate Scaffold
if you were following along and you still have the rails server open, you can press control-c into the terminal/command line to exit from the rails server first.
In the terminal, you can use this first command to create a scaffold:
rails g scaffold List title:string done:boolean
or
rails generate scaffold List title:string done:boolean
Database Migration
Then run the following code to create the database table for the list
rake db:migrate
and yes that is it you have created your first todo list application using rails.
now when you go to http://localhost:3000/ you still have the default rails page to get rid of it you should define a route to your application.
to do so you can open your project using Atom text editor if you have it installed by typing the following in your terminal
atom .
or just open the project folder with any text editor you currently have.
then navigate to config > routes as shown in the screenshot below:
once you open the file you can add the following :
root "lists#index"
your routes file code should look something list this:
Rails.application.routes.draw do
  resources :lists
  # For details on the DSL available within this file, see http://guides.rubyonrails.org/routing.html
  root "lists#index"
end
Adding bootstrap styling to your rails application
If you are following along, you have created an ugly todo list application, isn’t that an ugly-looking application. well, you can add a quick styling with bootstrap rails gem.
let’s rollback and start over. wait, start over ? yeah I said it. Rails can rollback without any issues but you have to do it in the current order.
Rails database rollback
First, let’s start with the database, we need to delete the table we have created. use the following command:
rake db:rollback
Congrats, the todo list table has been deleted.
Destroy Rails Scaffold
Next, delete the files that our scaffold created:
rails d scaffold List
or
rails destory scaffold List
done, we are back to zero.
Installing Rails Gems
okay, let add our styling so our simple todo list app looks sexy.
First, we need to add Rails gems if you still remember what is gems rails gems do. okay, we already talk about gems in getting to know Ruby on Rails.
To add rails gems we have to open the gems file, you will find it the root directory of your application. „Gemfile“
you can add the following gems to the end of the file
save the file and go back to the terminal/command line and type the following command to install the gems for your rails application
bundle i
or
bundle install
Adding Bootstrap templates
After the gems bundle is installed, you need to replace the default scaffold view template to the bootstrap view templates. todo so you can run the following command:
rails generate bootstrap:install
the terminal might ask you if you want to replace some files, you can just type yes then press enter. once you done running the command you are ready to create a sexy looking todo list application.
Generating Rails scaffold
well, we have done this already,
In the terminal, you can use this first command to create a scaffold:
rails g scaffold List title:string done:boolean
or
rails generate scaffold List title:string done:boolean
Database Migration
then run the following code to create the database table for the list
rake db:migrate
and yes that is it you have created your sexy todo list application using rails.
Start Rails server
run the server and look at that
rails s
or
rails server
what a great looking todo list app, in few mins without writing a single line of code.
Great, it is a Wrap!
That is great, you have reached the end of this article. well done. so we have covered the following topic
A quick history about ruby on rails
Pointing out the good and bad about ruby on rails
Preparing Rails development environment
Created our first Rails app.
Rails rollback process
And the process of Rails gems installation
At the end of the day, Rails is a strong framework and learning it will ensure greater success in your career.
This tutorial will briefly discuss the benefits of serving a trained Machine Learning Model with an API. Then we will take a look at a precise example using a Keras Model and Python Flask to serve the model. You’ll learn how to Serve Keras Model with Flask REST API.
Why serve ML Model with API?
Flexibility
Encapsulation the execution and manipulation of your machine learning model with an API has a few benefits. Of the benefit is the abstraction layer that you create with an (REST) API. This abstraction layer enables you to
test your application more easily (with tools that can send API Requests but cannot import your Tensorflow/PyTorch model directly
develop your application (you can initiate an execution with a REST Plugin, with your Browser or in CLI with curl
share functionality as a service (by deploying and making accessible via HTTPS; deploying it as a micro-service)
Mobility
Since your Model now be tweaked with pure HTTP Requests, you can deploy your Model and access/manage it via Requests. No need to login into the SSH to change a cronjob, to change a limit of SQL Query or initiate a new build to deploy a newer version.
Also, with REST API you can deploy your model easily to services like AWS ElasticBeanstalk, Google AppEngine, etc. They all need a working Server in order to deploy your app. And now you can call your Model an Application, because in fact, it is.
Serving Keras Model with Flask
The following Application Structure and Code are just one of the many possibilities how tackle this idea. If you don’t like it, you can check out the CookieCutter Template for more structure and MetaFlow for a whole complete framework.
Folder Structure
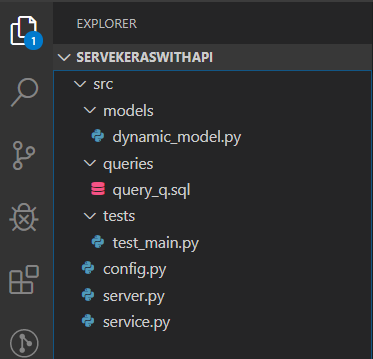
We need following folders to encapsulate the scripts, classes etc.
In the screenshot below you can see that we have a folder with different models (model_x.py). We need this separation because you could have multiple Machine Learning Models that need to be served by the same Flask Server. Optionally you can create a ML Model Loader Class that will create Machine Learning Model based a configuration file (e.g saved in yaml, json or database).
Minimal Folder Structure for a ML Model serving Application in Python.
In the queries folder you store your (in most cases very long) SQL Queries. You replace certain options with {parameter_x}, e.g: LIMIT {limit}. This way you’ll be able to dynamically generate parameterized SQL Queries reading the .sql File:
sql_file.read().format(limit=10000)
Tests/ are for tests. We are going to skip this due to scope.
Config.py is for Configurations (SQL Creds, Server Envs, etc.). We are going to skip this due to scope.
Server.py is for Flask serving our Services.
Our Services do certain actions with our model. For example: „train_service“ would initiate a training process for a certain model. „prediction_service“ would initiate a prediction process for a model and so on.
Machine Learning Model Class
In the code section below you can see a simple DynamicModel class with only one method which return the the compiled Keras Model. This Model does not have to be static and can be outsourced into a „build_model()“ method or similar. Also, all the parameters in the layers like the input_shape should be set via the method parameters from model(). Since this is only an introductory tutorial, many useful methods are missing in this class.
from keras.datasets import mnist
from keras.models import Sequential
from keras.layers import Dense, Dropout, Flatten
from keras.layers import Conv2D, MaxPooling2D
from keras import backend as K
import keras

"""
Author: Andrey Bulezyuk @ German IT Academy (git-academy.com)
Date: 18.01.2020
"""

class DynamicModel():
    def __init__(self, model_name = None):
        self.model_name = model_name

    def model(self):
        model = Sequential()
        model.add(Conv2D(32, (5, 5), input_shape=(28, 28, 1), activation='relu'))
        model.add(MaxPooling2D())
        model.add(Dropout(0.2))
        model.add(Flatten())
        model.add(Dense(128, activation='relu'))
        model.add(Dense(10, activation='softmax'))

        model.compile(loss=keras.losses.categorical_crossentropy,
                    optimizer=keras.optimizers.Adadelta(),
                    metrics=['accuracy'])
        return model
Service Layer
Why do we need a service layer between Flask API (server.py) and the Machine Learning Model (dynamic_model.py)? Simple. By having this extra layer (service.py) you can execute the services (in our case Class Methods) not only via REST API, but also from within other python modules.
Our service layer is responsible for importing the DynamicModel Class, loading and saving the trained model for prediction or training respectively.
import sys, os, datetime
sys.path.insert(1, os.path.join(os.getcwd(), "src/models"))
from dynamic_model import DynamicModel
from keras.datasets import mnist
from keras.utils import np_utils
from keras.models import load_model

"""
Author: Andrey Bulezyuk @ German IT Academy (https://git-academy.com)
Date: 18.01.2020
"""

class Service():

    # model_name must be supplied.
    # otherwise no configuration cad be loaded.
    def __init__(self, model_name=None):
        self.model_name = model_name
        self.dynamic_model = DynamicModel(self.model_name)

    def _get_train_data(self):
        (x_train, y_train), (x_test, y_test) = mnist.load_data()
        # reshape to be [samples][width][height][channels]
        x_train = x_train.reshape((x_train.shape[0], 28, 28, 1)).astype('float32')
        x_test = x_test.reshape((x_test.shape[0], 28, 28, 1)).astype('float32')

        y_train = np_utils.to_categorical(y_train)
        y_test = np_utils.to_categorical(y_test)

        self.x_train = x_train
        self.x_test = x_test

        self.y_train = y_train
        self.y_test = y_test

    def train(self):
        # Load data
        self._get_train_data()

        # This return the compiled Keras Model from dynamic_model->model()
        print(self.y_train)
        model = self.dynamic_model.model()
        model.fit(self.x_train, self.y_train,
            batch_size=1000,
            epochs=4,
            verbose=1)

        # Save trained model
        now = datetime.datetime.now()
        model.save(f"src/models/{self.model_name}_{now.year}{now.month}{now.day}_{now.hour}{now.minute}.h5")
        return True


    def predict(self, X):
        # Load model
        model = self._load_model()

        # Execute
        results = model.predict(X)
        if results is not None and results != False:
            return results
        return False
The train method works perfectly fine. You can see this in the section below when we execute it via Flask REST API with curl. The predict service method is not functional yet. The code and explanation for this is outside of the scope of this tutorial. Keep checking our IT Course Shop for similar courses with more in-depth material.
Flask API Server
Our server part is pretty simple. We import flask and our Service class. We create a route called ’service‘ with two parameters: service_name (which can be train, predict, stop, status, history, …) and model_name. Based on the parameters we execute the specified service.
import sys, os, json
sys.path.insert(1, os.getcwd())
sys.path.insert(1, os.path.join(os.getcwd(), "src"))
from flask import Flask, request
from service import Service

"""
Author: Andrey Bulezyuk @ German IT Academy (https://git-academy.com)
Date: 18.01.2020
"""

application = Flask(__name__)

@application.route("/")
def hello():
    return "Hello World!"


@application.route("/<string:service_name>/<string:model_name>", methods=["GET", "POST"])
def service(service_name=None, model_name=None):
    service = Service(model_name=model_name)

    # GET Request is enough to trigger a training process
    if service_name == 'train':
        service.train()
    # POST Request is required to get the X data for prediction process
    elif service_name == 'predict':
        service.predict()

    return f"Service: {service_name}. Model: {model_name}. Success."

if __name__ == "__main__":
    application.run(debug=True)
That’s it with our short tutorial. If you liked it, subscribe to our Newsletter for more Tutorials. If you have any Questions feel free to contact us or leave a comment.
PHP stands for Hypertext Preprocessor (earlier called „Personal home page“). It is an open source scripting language created for the web development. PHP is a server-side language which means all the code is rendered on server and only static HTML, CSS and JavaScript is sent to the client’s browser. PHP is a back-end language which means no one on client side can check the code written in PHP, only the person with authority to access the server can check the source code. Now let’s explore reasons to learn PHP 7 in 2020 and what lies ahead for this simple and beautiful language.
Why should I learn PHP 7 in 2020?
PHP is compatible with all leading operating systems such as Windows, Linux, MAC OS and many others. Likewise, it is compatible with all popular web servers such as Apache, NGINXm IIS etc. PHP7 offers great compatibility and performance. Not only is it open source but also it contains many features and it is absolutely easy to install and set-up. We will cover installation part later in this article.
What are features of PHP?
PHP comes with many benefits that let you create wonderful web applications.
1. Open Source
PHP is an open source programming language which means it is free to use. There is a great community to help you if you get stuck anywhere and not able to figure out the problem.
2. Cross-Platform
PHP supports all major operating systems and servers.
3. Easy to use
PHP is simple and clean scripting language. Its syntax is convenient to use. Anyone can quickly learn PHP.
4. Performance
It is one of the fastest programming language. It takes so little time to establish a connection with database or fetch data from web services.
How to install PHP7?
You can follow this guide to install PHP7 in your preferred operating system.
Windows :
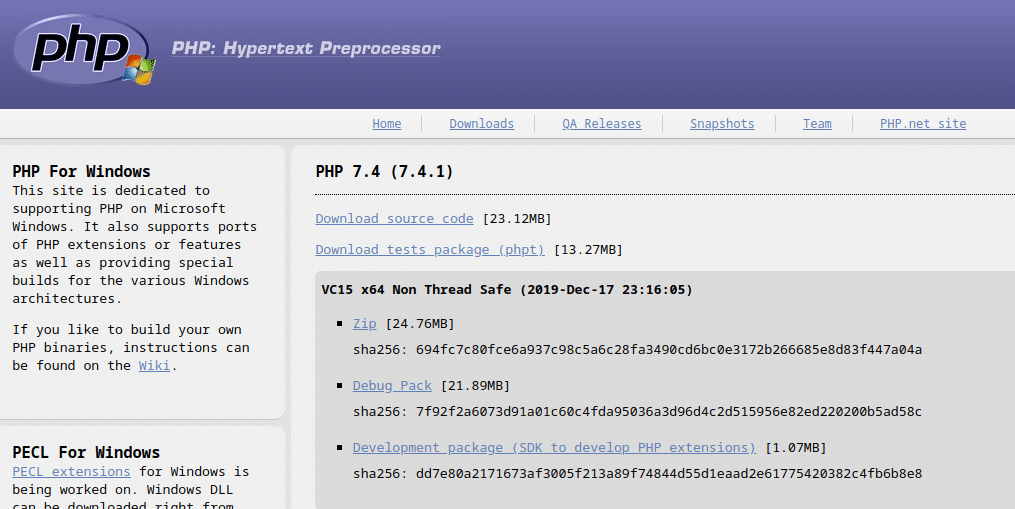
Step 1 – Download PHP7
Go to the official PHP website and download the latest version. Save it on your windows PC.
Figure 1
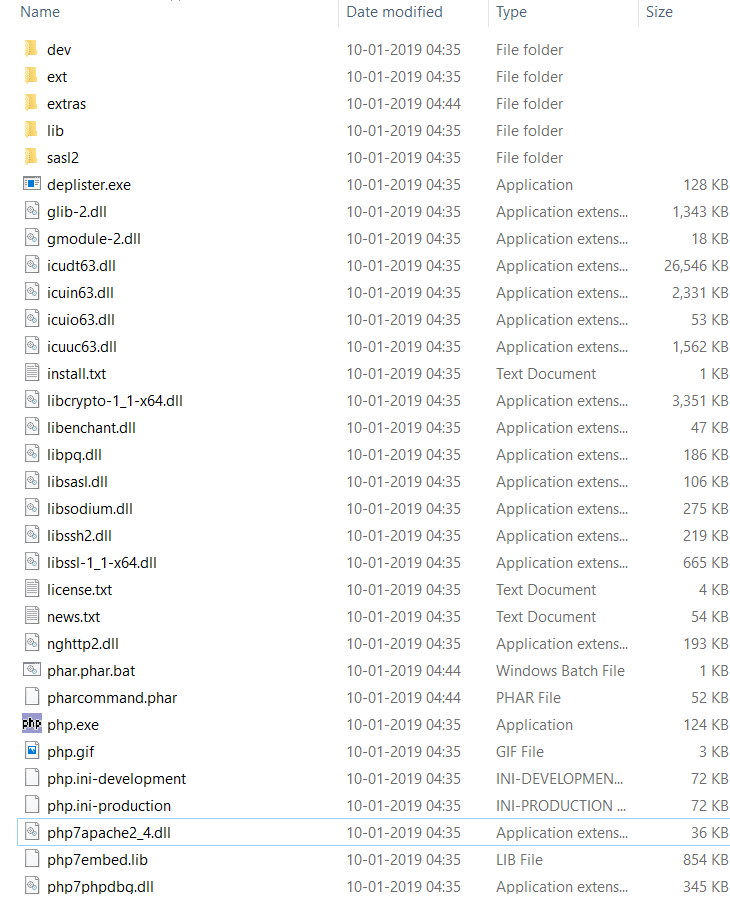
Step 2 – Extract the zip
Figure 2
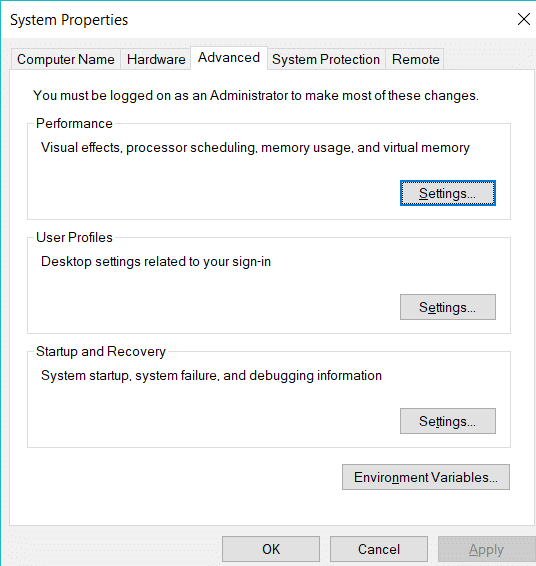
Step 3 – Setting up Environment variable
We need to configure the environment variable to access PHP from the command line. You can follow these steps to do so.
Right click -> My Computer (This PC) -> Properties -> Advanced system settings
This will open a the following window.
Figure 3
Now click on Environment variables, select path under the System variables section and edit. Add the path of installed PHP to system path.
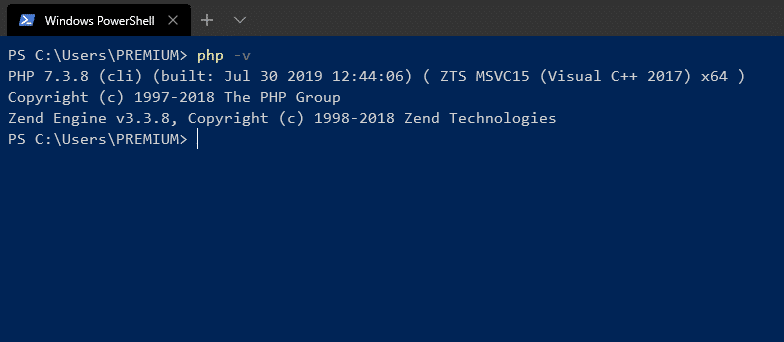
Click on the new button and add the path to the PHP bin. Save all changes and close all the windows. Now to verify the settings, open console (or CMD) and execute following.
FIgure 4
If you get the following output, it means PHP is successfully installed on Windows.
Linux:
Here, we will see the steps to install PHP in Ubuntu Linux.
Step 1 – Update Ubuntu
Before installing anything new, you should always update your system. Open a terminal and run the following commands:
apt-get upgrade && apt-get update
Step 2 – Install PHP7
You can install PHP7 from Ubuntu’s official repository by following command:
apt-get install php
This command will install PHP7 and it’s required dependencies. To check whether PHP is installed or not execute following command:
php -v
It will return the PHP version related information.
PHP7 Syntax Overview
Like any other programming language PHP has a set of syntax rules which we need to follow while programming. PHP files commonly have a .php file extension as they’re always executed on server.
Tags in PHP or Escaping to PHP
The PHP parsing engine needs a way to differentiate PHP code from other elements. PHP tags are used for this.
We can ‘Escape to PHP’ by using the following 4 methods:
Canonical PHP tags
SGML (or) Short HTML Tags
HTML Script Tags
ASP Style Tags
From all of the above, Canonical PHP tags are most commonly used and are compatible with majority of servers.
Example:
<?php
    # Here the echo command prints the message
    echo "Hello world";
?>
Comments in PHP
Comments are statements in a program by developers which describe the intent and purpose of the code. There are 2 styles for comments in PHP. Comments in PHP code are not read or executed by the PHP engine. Therefore, they do not affect the output.
Single Line Comment
<?php
// This is a single line comment

echo "Hello World";

# This is also a single line comment
?>
Multi line Comment
<?php
/*
Example for multiline comment
This is a multiline comment
*/

echo "Hello world";
?>
PHP Syntax is Case-Sensitive
In PHP besides variables, all other keywords are not case-sensitives. We have to be very careful while defining and using variables. Look at this example.
<?php
// Here all echo statements will execute
// in the same manner because keywords are case-insensitive

$variable = "Test";
ECHO $variable;

// You will get an "Undefined Variable" error
// Because variable names are case-sensitives

echo $VARIABLE;
?>
If you want to build a fast and beautiful Frontend for you PHP-Backend Application, consider the popular Framework Vue.JS 2 Course.
A Data type is the classification of data into a category according to its attributes. There are 4 major data types in PHP.
Integer – eg. 1, 1000, -12
Float – eg. 3.14
String – eg. „Test String“
Boolean – eg. True or False
Variables
A variable is a name given to a memory location that stores data at runtime. There are 2 types of variables, Global variables and Local variables. There are some pre-defined rules to create variables.
All variable names must start with the dollar sign. – eg. $testVariable
Variable names are case sensitive.
All variable names must start with a character.
Variable names must not contain any whitespaces between them.
PHP Control Structure – If else
If else is the simplest control structure. And it is relatively easy to understand even in PHP 7 in 2020. It evaluates the conditions using Boolean logic. Take a look at the following code snippet:
<?php
if (condition is true) {
   // Code block one
}else {
   // Code block two
}
?>
Here,
„(condition is true)“ is the control structure, if it evaluates to true, „Code Block one“ will be executed
If condition evaluates to false, „Code block two“ will be executed.
In any situation only one of the following blocks will be executed.
<?php

// If else example

$x = 10;
$y = 20;

if($x > $y) {

    echo "$x is greater than $y";

} else {

    echo "$y is greater than $x";

}

// Output: 20 is greater than 10

?>
PHP Loops
While Loop
The while loop is use to execute a block of code repeatedly until the codition gets statisfied.
<?php

while (condition) {
    // Code to execute
}

?>
Here,
Code inside of while loop will be executes until the given „condition“ is true.
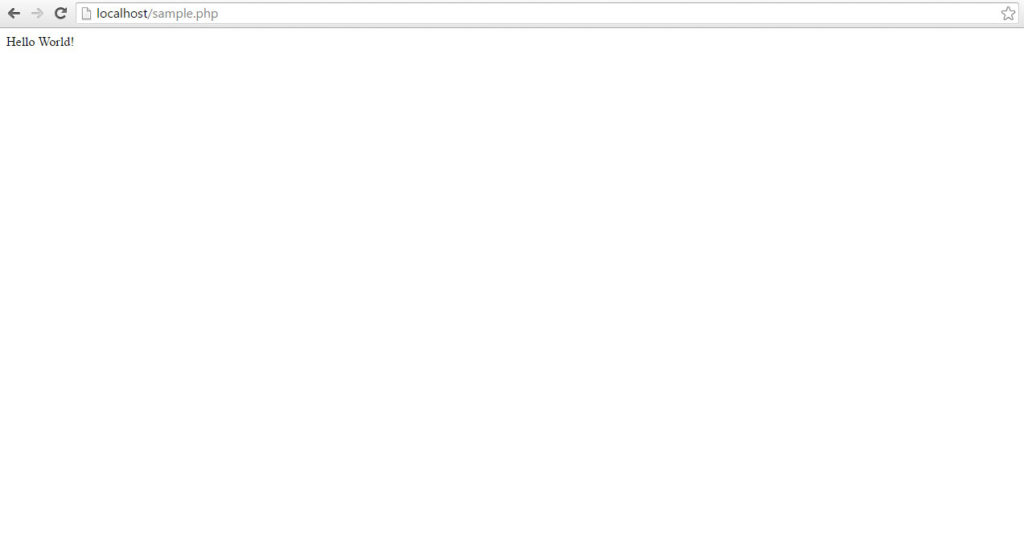
Step 1: Create your PHP file in www or htdocs folder of your server.
Step 2: Turn on your server.
Step 3: Go to http://localhost/<file_name>
Figure 5
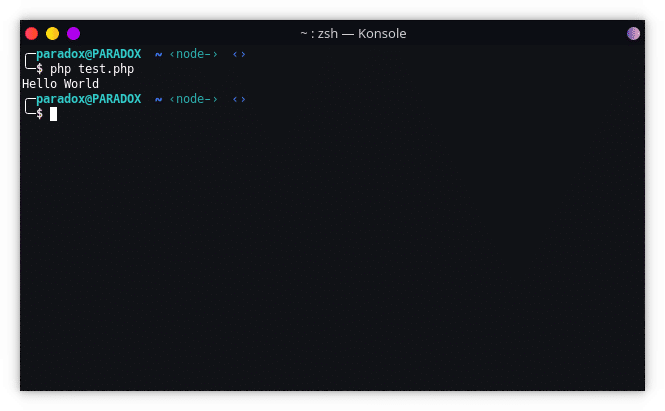
Executing PHP file from terminal (command line)
Step 1: Open your preferred terminal
Step 2: Navigate to your file location (directory)
Step 3: Execute the file by following command
php <filename.php>
Figure 6
As you can see, it will one of the best skills you could acquire for yourself and your resume. We are certain that PHP 7 in 2020, will have a continuously growing community.
The technical storage or access is strictly necessary for the legitimate purpose of enabling the use of a specific service explicitly requested by the subscriber or user, or for the sole purpose of carrying out the transmission of a communication over an electronic communications network.
Preferences
The technical storage or access is necessary for the legitimate purpose of storing preferences that are not requested by the subscriber or user.
Statistics
The technical storage or access that is used exclusively for statistical purposes.The technical storage or access that is used exclusively for anonymous statistical purposes. Without a subpoena, voluntary compliance on the part of your Internet Service Provider, or additional records from a third party, information stored or retrieved for this purpose alone cannot usually be used to identify you.
Marketing
The technical storage or access is required to create user profiles to send advertising, or to track the user on a website or across several websites for similar marketing purposes.