Introduction to Ruby on Rails
Have you been wondering how to build a web application? Perhaps you have started to learn programming languages but realizing that you had so much to climb the mountain and end up giving up. Or maybe you have been developing websites but it has been hard for you to maintain, keep track or upgrade your web application. In this article, we will learn about ruby on rails and the reasons behind using it as your backend development framework. I will also show you how to setup Ruby on Rails development environment and create a simple todo list application in few minutes with Ruby on Rails.
Getting to know Ruby on Rails
So let us address Ruby for a while before we go deep into this topic. Ruby is a programming language that was developed by Yukihiro Matsumoto from Japan in 1995. The idea of Ruby programming language is to put human need above computer needs, that is why Ruby is an object-oriented yet easy-to-use scripting language.
Okay, now we have a bit of history about Ruby programming language so let us talk ruby gems. Wait don’t get confessed yet, I am not talking about “a pink to blood-red colored gemstone”. What I talking about it is “a package manager for the Ruby programming language that provides a standard format for distributing Ruby programs and libraries, a tool designed to easily manage the installation of gems, and a server for distributing them” that is conveniently named RubyGems.
Alright, let’s take a breather…
Since we know that Ruby is a “human-friendly” programming language creating RubyGems was essential to making the language more powerful for a longer time.
Okay, know most probably you are wondering so what is it about Rails then?
In simple words, Rails is one of RubyGems. Rails is just a package that enables Ruby to run a webserver. So what is so special about it you might ask.
Rails
To begin with, Rails gem is not “only a package” but it is an entire framework for web development. Rails framework is built with the developers are in mind to keep the process of development as easy as it should be. It also has an easy learning curve compared to other frameworks.
Oh boy, we are going into a bit of detail here but don’t worry it will all make sense eventually.
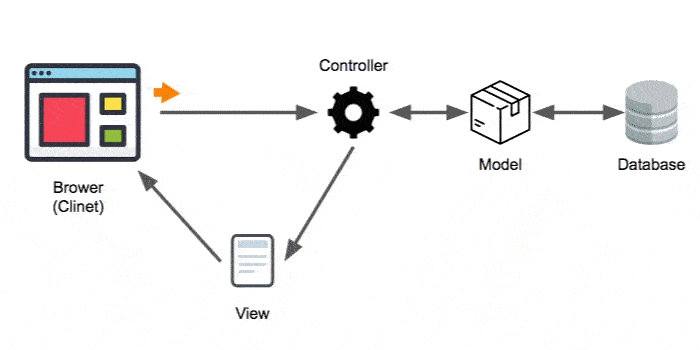
Let start with, “Rails is a model-view-controller (MVC)” framework.
Wait hold your horses… “MVC” what is this a channel name, something like MTV?
Well, that would be awesome, but I am sorry; it is not a channel name.
“MVC is an architectural pattern that separates an application into three main logical components. Each of these components are built to handle specific development aspects for an application” -wiki
Sound complicated? Not really. Here how Rails MVC works:
- Model: is Responsible for storing and retrieving data
- View: is Responsible for the rendering of the model (User interface)
- Controller: is Responsible for responding to user input and instructing the model to respond to the user input
A simple animated illustration is shown on how Rails MVC work is shown below:
Reasons why
Why Rails? Well, I will give you the reasons and you can be the judge of “why not rails?”
1. The process of development is much faster
Due to the object-oriented nature of Ruby and the enormous collection of open source code available within the Rails community, Rails development process is much faster compare to other programming languages.
2. Developers find it easy to move between different Rails projects
As developers working in many projects, keeping track of what different project code doing could be hard. But not in rails because of each project your create uses the same structure and coding practices.
3. Rails is good for rapid application development (RAD)
Because it is easy to accommodate changes, Rails is a great framework for rapid application development; were RAD is a methodology that prioritizes fast prototype releases and repetitions.
4. Ruby code is „humanize code“ and mostly self-documenting
Because Rails is build using Ruby, it takes advantage of ruby’s readability. which makes rails easy to pick up by other developers with code that has less documentation.
5. Develops a strong focus on testing
Rails have a strong testing framework that can test your application before deployment and helps developers find bugs or security threads.
6. Open source code
There are no licensing costs associated. Since Rails libraries are mostly open-source it is free to use for commercial uses, unlike other frameworks that have paid licensing.
Common concerns about ruby on rails
1. Hosts support for Rails
The support of hosting companies for Ruby on rails is not common. Comparing to PHP, javascript, Java, and C to Ruby, Ruby is a slow programming language. But it should not be a deal-breaker. With hosting providers like Heroku and EngineYard, you can deploy your application for the world to see in minutes.
2. Performance and Scalability
Rails applications are not as fast as Java or C, which is true. it does not stop big companies to rely on Rails as their primary framework. Big companies such as Airbnb, Twitch, Kickstarter and many more. The majority of applications developed by Rails are fast enough. Although Ruby on Rails is not the fastest programming language.
Ruby on Rails Development Environment setup
Setup on Mac/Linux machines
Installing homebrew (MAC/Linux)
Start by installing homebrew in your mac machine. To do so you have to run the following command in your terminal:
/usr/bin/ruby -e "$(curl -fsSL https://raw.githubusercontent.com/Homebrew/install/master/install)"Installing Ruby (MAC/Linux)
Now that we have Homebrew installed, we can use it to install Ruby.
We’re going to use rbenv to install and manage our Ruby versions.
To do this, run the following commands in your Terminal:
brew install rbenv ruby-build

# Add rbenv to bash so that it loads every time you open a terminal
echo 'if which rbenv > /dev/null; then eval "$(rbenv init -)"; fi' >> ~/.zshrc
source ~/.zshrc

# Install Ruby
rbenv install 2.7.0
rbenv global 2.7.0
ruby -v
Installing Rails (MAC/Linux)
Installing Rails is as simple as running the following command in your terminal:
gem install rails -v 6.0.2.1Rails is now installed, but in order for us to use the rails executable, we need to tell rbenv to see it:
rbenv rehashAnd now we can verify Rails is installed:
rails -v
# Rails 6.0.2.1
Setting Up A Database for macOS Searia
Rails ships with sqlite3 as the default database. Chances are you won’t want to use it because it’s stored as a simple file on disk. You’ll probably want something more robust like MySQL or PostgreSQL; but for our purposes, we will only need a simple setup to get started.
Because we can’t use the built-in sqlite3 version with macOS Sierra without running into some troubles, we’re going to install from homebrew.
brew install sqlite3Setup on Windows machines
Installing Ruby (Windows)
To install Ruby for windows, you can go download the ruby installer and install it like any other application
Once you installed ruby go ahead and open the command prompt. to confirm ruby successfully installation you can type the following command
ruby -v Installing Rails (Window)
After installing ruby you can open the command prompt and type the following to install Rails
gem install railsonce you installed Rails, you can verify by typing the following:
rails -v and that should be it for windows users, lucky you windows user!
Creating your first Rails Application
Generate Rails Application Files
After installing Ruby on Rails we can start with creating a simple application to see how fast and easy it is to make solid applications using Rails. open your terminal/command line then navigate to where you want to create your project using cd command for example cd Desktop/
to create a new rails project you can type the following command:
rails new <name_of_your_project>For our example, we are going to make a simple todo list application so if you want to follow along with type the following code instead:
rails new todolistappCreating a Database for Your Rails Appliaction
Then press enter and wait for the magic to happen. once rails finish generating your todo application you have to navigate to the newly created project folder:
cd todolistappthen run the following code to create the database for your application
rake db:createStarting Rails Server
once created the database try to run the rails server by typing
rails sor
rails serverAfter run the rails server you can open a new browser window and load http://localhost:3000/ to view your newly created rails application.
Using rails scaffold to create a simple todo list application
Okay, you have come through so far. now we have a todo list app created and our server is loading the rails default page.
will now let us make it our own and change it to our needs.
let us list down the „todo list“ for our todo list app: (sound funny when you put it this way) anyhow here:
- database table for the todo list app.
- model to update the database.
- views to display the model data.
- a controller that takes the user input and sends back view.
doesn’t that sound a lot todo? Well, it is a lot to do for creating a simple app like this! But not with Rails.
you can use two commands to do all of this for you.
Generate Scaffold
if you were following along and you still have the rails server open, you can press control-c into the terminal/command line to exit from the rails server first.
In the terminal, you can use this first command to create a scaffold:
rails g scaffold List title:string done:booleanor
rails generate scaffold List title:string done:booleanDatabase Migration
Then run the following code to create the database table for the list
rake db:migrateand yes that is it you have created your first todo list application using rails.
Start Rails Server
run the server again using :
rails sthen go to http://localhost:3000/lists and test it yourself.
Changing the default route
now when you go to http://localhost:3000/ you still have the default rails page to get rid of it you should define a route to your application.
to do so you can open your project using Atom text editor if you have it installed by typing the following in your terminal
atom .or just open the project folder with any text editor you currently have.
then navigate to config > routes as shown in the screenshot below:

once you open the file you can add the following :
root "lists#index"your routes file code should look something list this:
Rails.application.routes.draw do
  resources :lists
  # For details on the DSL available within this file, see http://guides.rubyonrails.org/routing.html
  root "lists#index"
end
Adding bootstrap styling to your rails application
If you are following along, you have created an ugly todo list application, isn’t that an ugly-looking application. well, you can add a quick styling with bootstrap rails gem.
let’s rollback and start over. wait, start over ? yeah I said it. Rails can rollback without any issues but you have to do it in the current order.
Rails database rollback
First, let’s start with the database, we need to delete the table we have created. use the following command:
rake db:rollbackCongrats, the todo list table has been deleted.
Destroy Rails Scaffold
Next, delete the files that our scaffold created:
rails d scaffold Listor
rails destory scaffold List done, we are back to zero.
Installing Rails Gems
okay, let add our styling so our simple todo list app looks sexy.
First, we need to add Rails gems if you still remember what is gems rails gems do. okay, we already talk about gems in getting to know Ruby on Rails.
To add rails gems we have to open the gems file, you will find it the root directory of your application. „Gemfile“
you can add the following gems to the end of the file
gem 'jquery-rails'
gem 'bootstrap-generators', '~> 3.3.4'
gem 'record_tag_helper', '~> 1.0'
save the file and go back to the terminal/command line and type the following command to install the gems for your rails application
bundle i or
bundle installAdding Bootstrap templates
After the gems bundle is installed, you need to replace the default scaffold view template to the bootstrap view templates. todo so you can run the following command:
rails generate bootstrap:installthe terminal might ask you if you want to replace some files, you can just type yes then press enter. once you done running the command you are ready to create a sexy looking todo list application.
Generating Rails scaffold
well, we have done this already,
In the terminal, you can use this first command to create a scaffold:
rails g scaffold List title:string done:booleanor
rails generate scaffold List title:string done:booleanDatabase Migration
then run the following code to create the database table for the list
rake db:migrateand yes that is it you have created your sexy todo list application using rails.
Start Rails server
run the server and look at that
rails sor
rails serverwhat a great looking todo list app, in few mins without writing a single line of code.
Great, it is a Wrap!
That is great, you have reached the end of this article. well done. so we have covered the following topic
- A quick history about ruby on rails
- Pointing out the good and bad about ruby on rails
- Preparing Rails development environment
- Created our first Rails app.
- Rails rollback process
- And the process of Rails gems installation
At the end of the day, Rails is a strong framework and learning it will ensure greater success in your career.
You can find the code for this article in GitHub