Serving Machine Learning Model with MLFlow
We are going to briefly follow the Quickstart in the official MLFlow Documentation. We will create, serve and invoke a Machine Learning Model with MLFlow.
Installation
pip3 install mlflowCreate a new folder for our little project and create a new file called generate_model.py.
import pandas as pd
import mlflow.pyfunc


class Churn_one(mlflow.pyfunc.PythonModel):
    def __init__(self, n):
        self.n = n

    def predict(self, context, model_input):
        return model_input.apply(lambda column: column + self.n)


# Construct and save the model
model_path = "Churn_one"
Churn_one = Churn_one(n=5)
mlflow.pyfunc.save_model(path=model_path, python_model=Churn_one)

# Load the model in `python_function` format
loaded_model = mlflow.pyfunc.load_model(model_path)

model_input = pd.DataFrame([range(10)])
model_output = loaded_model.predict(model_input)
assert model_output.equals(pd.DataFrame([range(5, 15)]))
print(model_output)
Briefly explained: we import mlflow. We create a Class that which is kind of our Class Model/Classifier. With the next three lines we save our Class as a „pyfunc“ model. You can read what a pyfunc is here. Now execute this file with
python3 generate_model.pyMLFlow will create a new Folder „Churn_one“. This Folder is a self-contained Version of the Class-Model from the previous file. Inside this Folder we see following:

The conda.yaml is the definition of your python environment that is needed to make your Model work. MLmodel is a File that contains meta-data about your model – the syntax is very poorly explained in the official docs. The pkl will contain pickled data for our model.
Serving the Model with MLFlow
Now we need to serve our Machine Learning Model. You can either create a Flask server, like we discussed in this post. But we are going to use the built-in feature of MLFlow serve. This will spawn a Flask Server for us and do all the work. We start a ML Server with
mlflow models serve -m Churn_one -h 0.0.0.0 -p 5000
Serving on http://0.0.0.0:5000
Now we can invoke prediction process for our model. We have to create a POST Request to http://localhost:5000/invocations . Obviously, if you deploy this server into an EC2 Instance or another public server, you’ll be able to call your public ip to invoke your ML Model like: http:PUBLIC_IP:5000/invocations.
Check out the Mlflow Online Courses
MLflow for Beginners
MLOps is a breed of Machine Learning and DevOps. The most popular framework in this niche is the MLFlow Framework. Do you need to create trackable, reproducible and scalable Machine Learning Applications? This Online Course willl teach you MLflow from scratch. Pre-Order Course – still in development.
I’ll use a UI Request Generator and create a POST Request. I expect the ML Server to receive this Request, make some predictions with the model, and give me back some results. The data that our Model needs to run predictions, will be supplied in the POST Request in JSON Format.
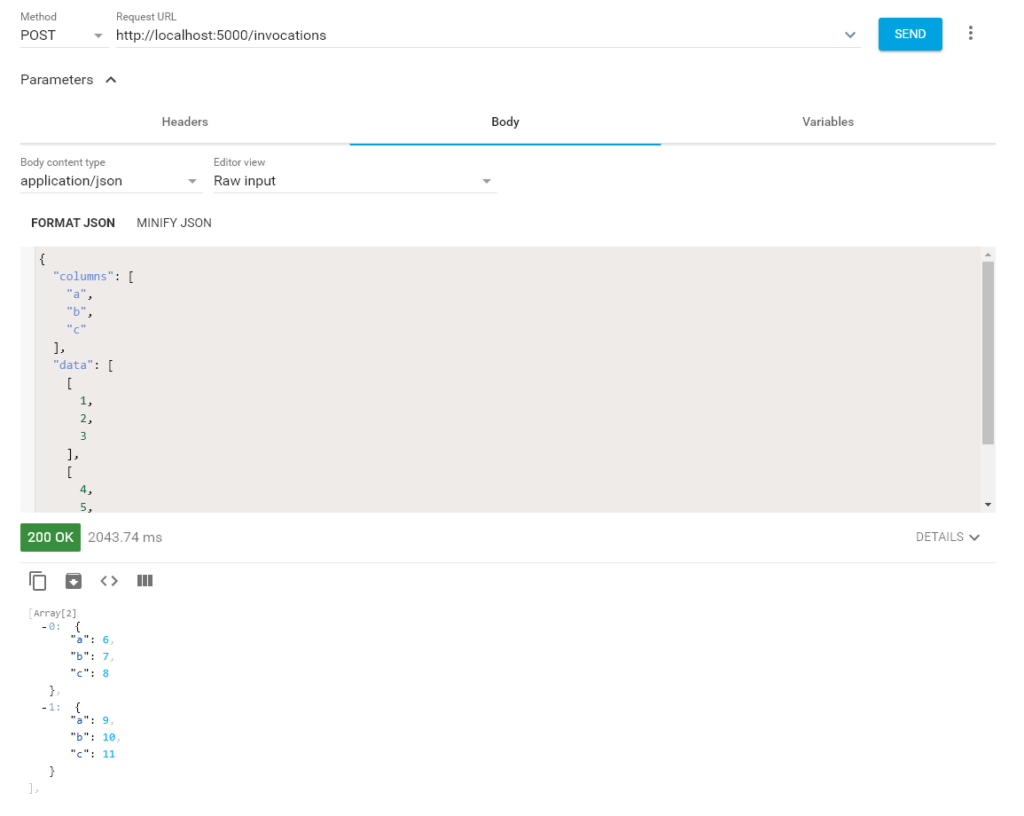
In the Screenshot above you see the POST Request to our Server and the JSON Payload with our Prediction Data. The data has to be in JSON Format. And this Format has to have keys of Columns and Data. These Columns will be converted to a pandas DataFrame. This DataFrame will then be used to insert into your model to run the predictions.
Below is the result of running predictions on our Model with the supplied data. And that is it. The Workflow is pretty simple once you got it. You create an MLModel out of your current Machine Learning Model. You use this new MLModel Format to serve your model. The hardest part is most probably the correct converting of your Python Model Classes/Function into the MLModel Format without any limits.