A decade ago, if you wanted to start a career as a software programmer/developer, you had to earn a bachelor’s degree in computer science, computer information systems, software engineering, or math. However today, you have many other options which will introduce you to the world of programming. Some of these ways include coding boot camps and training programs. One such program is the Python Backend Development Degree (24 weeks) being offered by German IT academy.
Backend programming is pertinent to website building and happens to be one of the most sought after and highly paid programming skill. German IT academy is teaching all about it in just 24 weeks whereas you might spend 4 years in an educational institute learning half the things and paying 10x more. Let’s look into the details to determine its suitability and demand in contemporary job market.
Is a training program/online degree worth it?
Nowadays, it is more important to have skills than a degree. Skill is what made Mark Zuckerberg and Steve jobs, not college degrees. Also;
What’s great about programming is that you can acquire this skill at any stage in your life.
This idea is also appealing if you do not want to waste four years of your life learning half the things you would have no use for. A quick way to fulfill your programming aspirations is to become a backend developer. There are many kinds of programmers, but backend developers are some of the most sought after experts in their fields.
It’s also important here to mention that an educational degree has credence of its own and we are not in any way discouraging the students from studying in 4 years degree programs. It’s all about what suits you depending on your budget and goals.
Why go for Python Backend Development Degree?
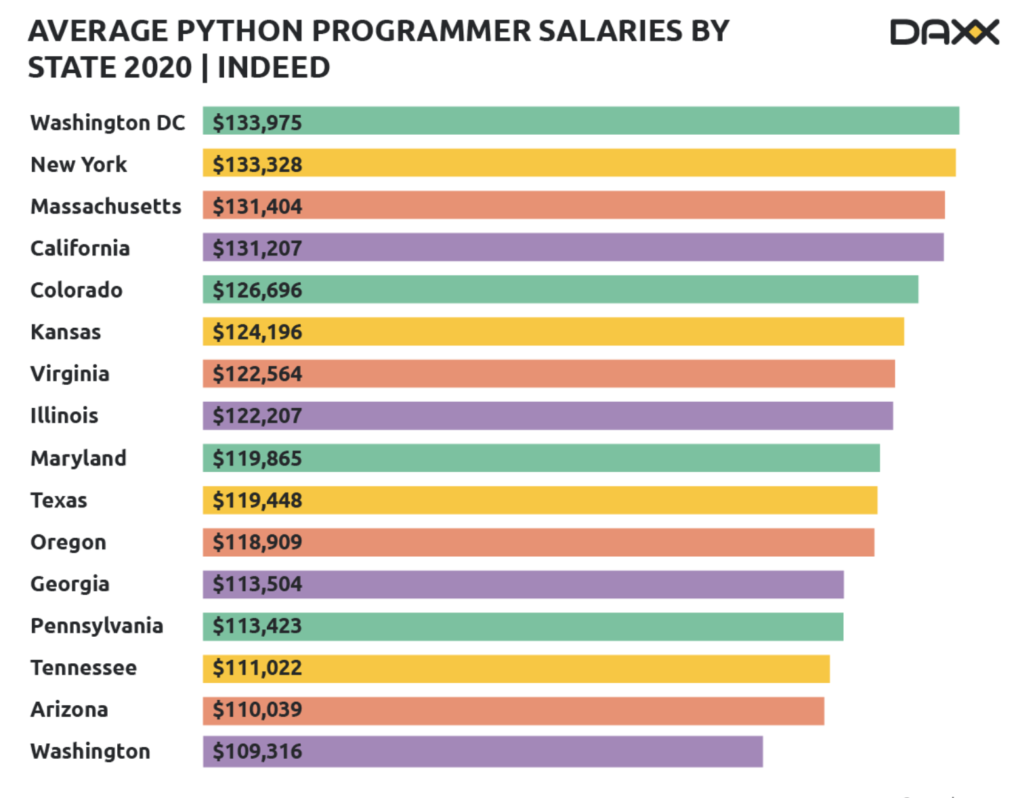
A backend developer can easily make up to $133,975 annually and it is something that you can easily do in the comfort of your home, in an office, or as a freelancer who is continents apart from his or her client. Are you intrigued and want to learn more about being a backend developer. Here are some things that you should know.
If working remotely, you can achieve pretty impressing salaries.
What is Backend Development?
Backend development is what keeps the internet running in background. Backend developers mostly focus on how a website should work. They write code for the functionality and logic powering the application that are running on user end, and the main coding they work on is never seen by users. Backend Engineers can be found across industries, helping to build websites using advanced technologies for all kind of companies. The technology of back end is a combination of applications, servers and databases.
Websites on internet are based on thousands of lines of code that is based on computer languages. Just like we understand a specific language, to design applications programmers have to write that code which tells the computer what to do, how to make a specific website look, work and interact with a user.
German IT academy
German IT academy is offering online courses for students in the field of programing and information technology. The courses are very detailed and promise to impart the related skill quite proficiently. Another important thing about these courses is the minimal price at which they are being offered. All these factors make the academy a viable place for learning the important skills that can help you earn handsomely from the comfort of your home. Now, the academy is offering its new online course with great demand.
Python Backend Development Degree
German IT Academy is launching a new Product „Backend Developer Degree 24weeks“. The reason that most of the students are so much interested in this program is that Backend developers are in great demand in today’s era of information and technology. We are surrounded by web and backend development is inevitable to keep it running. This makes it a great skill with annual earnings up to $133,975 and that too with a balanced life where you work at your disposal without any stress.
The Python Backend Development Degree comprises of all the essentials you need in order to become a successful backend developer. With the basic language Python 3, you can also expect to learn some of the Linux basics as well while also touching on REST APIs and Python Frameworks. Our Backend Developer Degree offers you to learn backend development language which basically work on the background of many web applications and websites. The work you will learn actually allows the web to connect to databases, power web applications, manage user connections and much more.
What we will teach you?
Let’s get to the nitty gritty of the 24 weeks degree and open it up for our students to let them have a better idea of what’s on the offer and why they should take it. Here are some of the things that you will learn with us as a backend developer:
1. The language Python 3
Python 3 is widely used for artificial intelligence, with packages for several application fields including Machine Learning, Natural Language Processing and Data Science. As a programmer, it will elevate your programming skills and help you understand basics more.
2. PostgreSQL and NoSQL Databases
These are some of the most commonly used databases that you will come across and need to understand. The program encompasses a brief introduction of these databases to make the students familiar with their working and use in backend programming.
3. Creating Rest APIs
Rest APIs are part of web infrastructure and as a programmer it is significant that you have command over this particular subject.
4. Python Frameworks; Django and Flask
This is an old age debate about which framework is better. Every programmer has a preference, but if you want to be a backend developer, it is important to understand both. So, we will teach you both.
5. Linux and Clouds
Linux provides a more free hand to programmers than windows. Learning the basics of Linux and Cloud Services like Google Cloud or AWS are essential for a programmer.
6. Creating Simple Websites
It is the bread and butter of any programmer, especially the beginners. Learning how to make simple websites, using host sites, and website builders are some of the essential skills you should learn. We believe in imparting money making skills, so you can learn this handy skill in the program as well.
7. Learning Git
Git is a distributed version-control system for tracking changes in source code during software development. It is designed for coordinating work among programmers, but it can be used to track changes in any set of files. Its goals include speed, data integrity, and support for distributed, non-linear workflows.
Why online learning is for you?
Students faced with the challenge of balancing work, family, and education, may find that an online degree is an ideal solution for them. Further, pursuing an online degree can prepare students for career advancement and showcase their key skills to potential employers. Also, Covid-19 will displace a lot of programmers from office into their homes. So working and studying from home should a no-brainer from now on. Your Python Backend Developer Degree will be a nice side effect after the lockdown ends.
Self-Paced Learning
Self-paced learning differs from the traditional class lessons. The self-paced method allows students to design their own learning experience, not only at their comfort level, but according to their own interests and learning preferences. The role of the instructor is to provide guidance, feedback on proficiency and tailor the learning environment to students‘ needs. We will teach you to become better learners on your own under our guidance.
Time Management
Time management is important because it helps you control your workday. Control allows you to build your business or perform your job without compromising your work-life balance. Better time management improves your performance and work output. You will get work done on time, boost your own confidence and improve career opportunities.
Virtual Communication and Collaboration
Virtual Communication will also boost when you will participate in discussion boards with your class fellows, communicate with instructor and collaborate through various soft wares. The abundance of different tools (Zoom, MS Teams, … ) make this process frictionless.
Self-Motivation with Python Backend Development Degree
By earning an online degree, you can prove that you are able to tackle multiple tasks, set priorities, and adapt to changing in every work conditions. This skill is among the top 10 employability skills employers want to see in new hires and is essential for a backend developer.
Critical-thinking Skills
Critical thinking plays an important role in any type of education or a job. Online learning forces you to develop your critical thinking skills in different ways that you might not have experienced before. This sort of self-paced and self-motivated learning develops critical thinking skills. A creative programmer will become a backend developer who is always in demand. In this field, your work speaks for itself.
What it will cost you?
The students are apprehensive of the costs of online programs and believe that these are always overpriced. German IT academy has solved the problem. The Python Backend Development Degree will cost you between $54 and 60$ per month (depending on your payment plan). It’s a 6 months long course which you can easily do in comfort of your home and by paying a minimal amount which is nominal in comparison to the money making skills it impart.
The next question can be about the quality of online teaching and students can have concerns about it because of the low price. We assure you that you’ll find the program to be one of its kind and the level of teaching is unmatched by any of the competitive programs. The online certificate is also recognized well by many industries and institutes. It is inexpensive yet the best because we believe in empowering our students with the finest of skills and in helping them achieve their dreams.
We are going to briefly follow the Quickstart in the official MLFlow Documentation. We will create, serve and invoke a Machine Learning Model with MLFlow.
Installation
pip3 install mlflow
Create a new folder for our little project and create a new file called generate_model.py.
import pandas as pd
import mlflow.pyfunc


class Churn_one(mlflow.pyfunc.PythonModel):
    def __init__(self, n):
        self.n = n

    def predict(self, context, model_input):
        return model_input.apply(lambda column: column + self.n)


# Construct and save the model
model_path = "Churn_one"
Churn_one = Churn_one(n=5)
mlflow.pyfunc.save_model(path=model_path, python_model=Churn_one)

# Load the model in `python_function` format
loaded_model = mlflow.pyfunc.load_model(model_path)

model_input = pd.DataFrame([range(10)])
model_output = loaded_model.predict(model_input)
assert model_output.equals(pd.DataFrame([range(5, 15)]))
print(model_output)
Briefly explained: we import mlflow. We create a Class that which is kind of our Class Model/Classifier. With the next three lines we save our Class as a „pyfunc“ model. You can read what a pyfunc is here. Now execute this file with
python3 generate_model.py
MLFlow will create a new Folder „Churn_one“. This Folder is a self-contained Version of the Class-Model from the previous file. Inside this Folder we see following:
New Folder with new Files inside the MLFLOW Model.
The conda.yaml is the definition of your python environment that is needed to make your Model work. MLmodel is a File that contains meta-data about your model – the syntax is very poorly explained in the official docs. The pkl will contain pickled data for our model.
Serving the Model with MLFlow
Now we need to serve our Machine Learning Model. You can either create a Flask server, like we discussed in this post. But we are going to use the built-in feature of MLFlow serve. This will spawn a Flask Server for us and do all the work. We start a ML Server with
Now we can invoke prediction process for our model. We have to create a POST Request to http://localhost:5000/invocations . Obviously, if you deploy this server into an EC2 Instance or another public server, you’ll be able to call your public ip to invoke your ML Model like: http:PUBLIC_IP:5000/invocations.
Check out the Mlflow Online Courses
MLflow for Beginners
MLOps is a breed of Machine Learning and DevOps. The most popular framework in this niche is the MLFlow Framework. Do you need to create trackable, reproducible and scalable Machine Learning Applications? This Online Course willl teach you MLflow from scratch. Pre-Order Course – still in development.
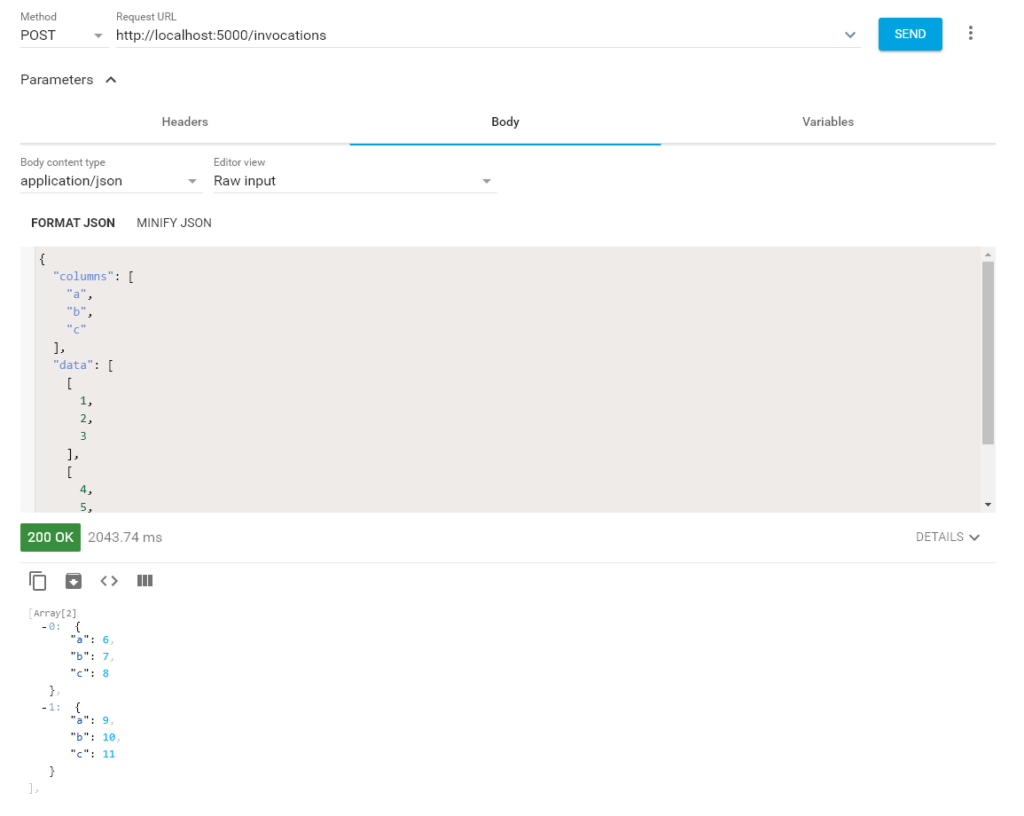
I’ll use a UI Request Generator and create a POST Request. I expect the ML Server to receive this Request, make some predictions with the model, and give me back some results. The data that our Model needs to run predictions, will be supplied in the POST Request in JSON Format.
POST Request to MLFlow Server with Results returned.
In the Screenshot above you see the POST Request to our Server and the JSON Payload with our Prediction Data. The data has to be in JSON Format. And this Format has to have keys of Columns and Data. These Columns will be converted to a pandas DataFrame. This DataFrame will then be used to insert into your model to run the predictions.
Below is the result of running predictions on our Model with the supplied data. And that is it. The Workflow is pretty simple once you got it. You create an MLModel out of your current Machine Learning Model. You use this new MLModel Format to serve your model. The hardest part is most probably the correct converting of your Python Model Classes/Function into the MLModel Format without any limits.
We compare two Machine Learning and Data Science frameworks – MLFlow vs. Metaflow. These Data Science and Machine Learning Frameworks are the most popular in their category – ML. They provide you a fixed set or best practices, methods, classed and helping tools (like UIs or APIs). They support your ML or DS Project Lifecycle.
If you want to learn more about Machine Learning, consider browsing through our Online Course Section!
Introduction MLFlow
MLFlow was developer and open sourced by Databricks. Here is how MetaFlow describes itself in their Intro Blog Post:
MLflow is designed to work with any ML library, algorithm, deployment tool or language. It’s built around REST APIs and simple data formats (e.g., a model can be viewed as a lambda function) that can be used from a variety of tools, instead of only providing a small set of built-in functionality. This also makes it easy to add MLflow to your existing ML code so you can benefit from it immediately, and to share code using any ML library that others in your organization can run.
Introduction Metaflow
The official Metaflow description of itself is very good, so here goes copy & paste:
Metaflow is a human-friendly Python library that helps scientists and engineers build and manage real-life data science projects. Metaflow was originally developed at Netflix to boost productivity of data scientists who work on a wide variety of projects from classical statistics to state-of-the-art deep learning.
Our framework provides a unified API to the infrastructure stack. It’s required to execute data science projects – from prototype to production.
Community, Popularity and Reliability
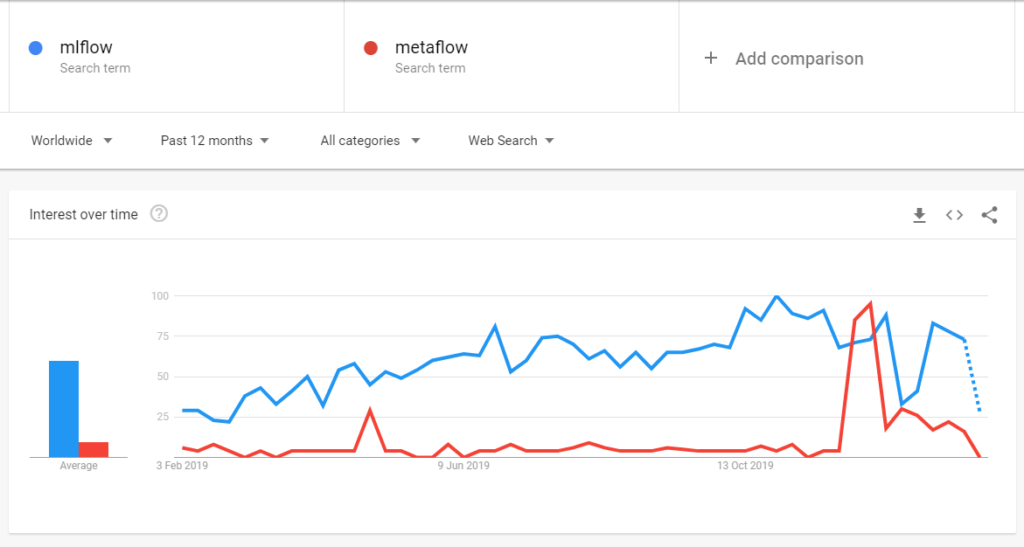
The popularity of framework is pretty important. Here is why. When you run into a problem, you will turn to Google and StackOverflow for help and you will beg that someone knows what framework you are using. So here is a Google Trends for MLFlow vs Metaflow. As you can see below, metaflow peaked shortly in late 2019. But overall, MLFlow wins.
MLFlow vs. MetaFlow
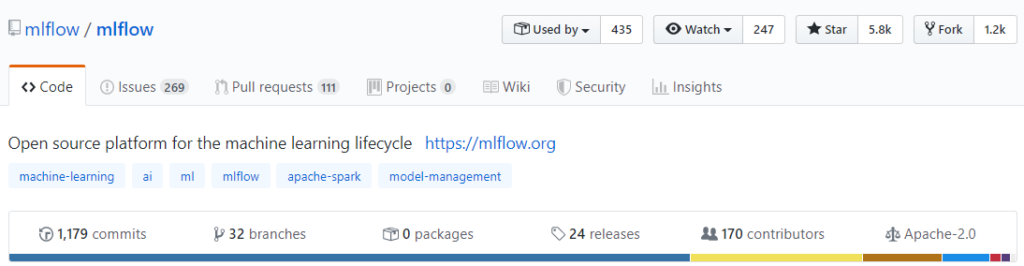
Another critical point is the Community behind a Codebase. The bigger the community the more reliable (in most cases) the codebase. The following Github Screenshots speak for themselves. And MLFLow wins again.
MLFlow
MLFlow has more than 160 Contributors and is forked around 1200 times.
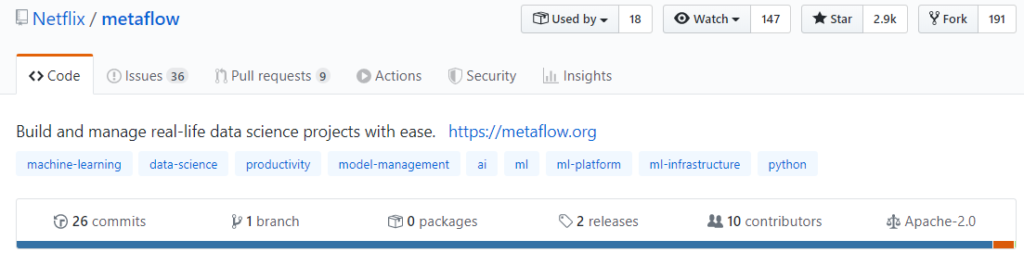
Metaflow
Metaflow has more than 15 Contributors and is forked around 190 times.
Meta-Logging, Training, Deploying
A ML Framework should provide us with a healthy balance between concrete ways to implement a new project – which reduces complexity. But it also should give us enough freedom to experiment and stay flexible for unusual business/technical environments.
The most pressing issue, in my experience, is the fact that when you train your model locally, you don’t save any data about this process. Re-producing the same results may be difficult. Or even a more simple task, just retrieve the training results from last week…you can’t, cause you started to tune your hyperparameters and retrained your model 10 times more that day. An ML framework should collect metadata about these and other similar processes.
MLFlow Tutorial
Let’s take a look at MLFlow from a practical side. Installation, Usage, UI, etc.
pip3 install mlflow

mlflow
Usage: mlflow [OPTIONS] COMMAND [ARGS]...

Options:
  --version  Show the version and exit.
  --help     Show this message and exit.

Commands:
  artifacts    Upload, list, and download artifacts from an MLflow artifact...
  azureml      Serve models on Azure ML.
  db           Commands for managing an MLflow tracking database.
  experiments  Manage experiments.
  models       Deploy MLflow models locally.
  run          Run an MLflow project from the given URI.
  runs         Manage runs.
  sagemaker    Serve models on SageMaker.
  server       Run the MLflow tracking server.
  ui           Launch the MLflow tracking UI for local viewing of run...


mlflow ui
Serving on http://localhost:5000
Now let’s run the basic dummy script below to generate some meta/tracking data.
import mlflow
# Start an MLflow run

with mlflow.start_run():
  # Log a parameter (key-value pair)
  mlflow.log_param("param2", 3)

  # Log a metric; metrics can be updated throughout the run
  mlflow.log_metric("foo", 2, step=1)
  mlflow.log_metric("foo", 4, step=2)
  mlflow.log_metric("foo", 6, step=3)


  # Log an artifact (output file)
  with open("output.txt", "w") as f:
      f.write("Hello world!")
  mlflow.log_artifact("output.txt")
python3 mlflow_test.py
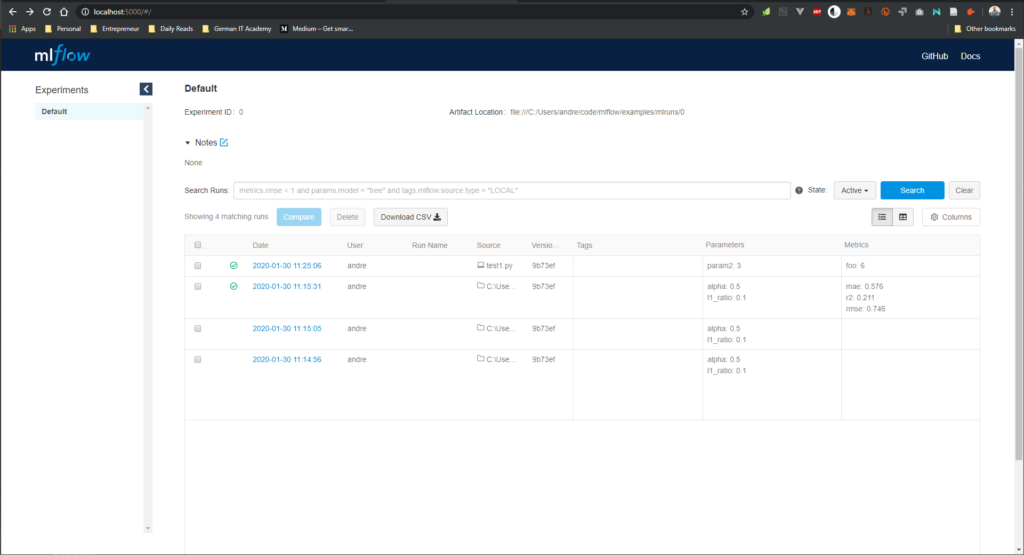
MLFlow UI Experiments
On the frontpage you can see all the executions that i executed either with „mlflow run …“ or with „python mlflow_code.py“.
You can see even those executions that failed. Which is pretty awesome for developing and debugging.
Extremely important is the feature of comparing different experiments with one another which you can do on this page.
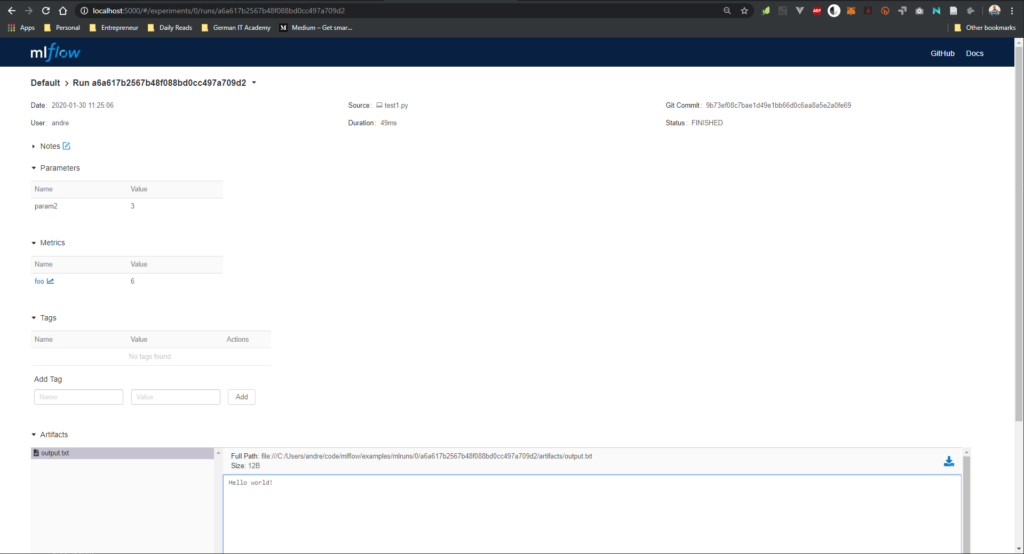
MLFlow UI Params
On the Single Experiment Page you’ll see stuff like Date, User, Source, Duration of this particular Experiment (Execution, Flow).
You also can see Tags and a List of Artifacts with Preview mode – which is awesome. In our case the dummy code from above generated a text file with „Hello World“ in it!
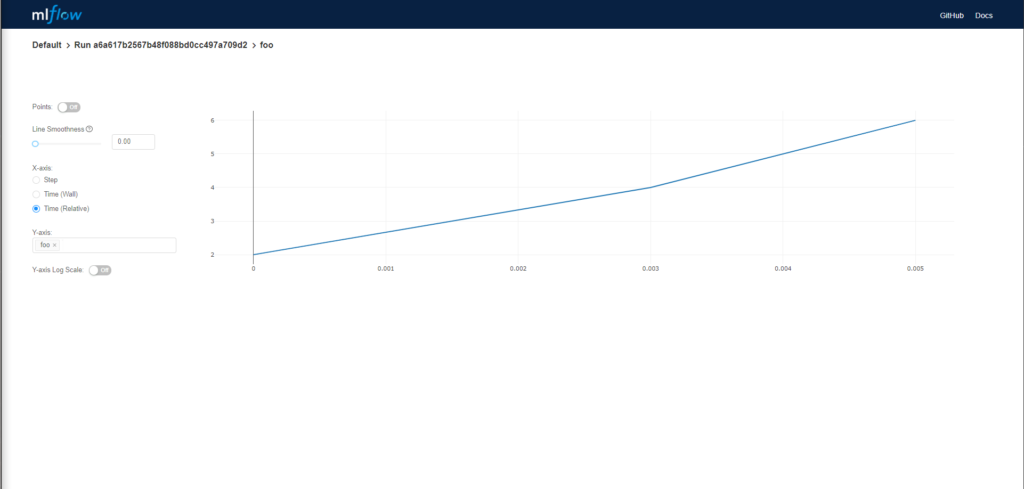
MLFlow UI Metric Chart
Another awesome feature of MLFLow is the chart which will display your metrics (that you set up manually) in a chart.
MetaFlow Tutorial
First of all, i’m on Windows. You can’t use MetaFlow on Windows without some crazy tweaks. In fact, MetaFlow said they won’t support Windows. So this is already is a nogo for me (shouldn’t be a problem if you are on Linux). For the purpose of demonstration i’ll boot a Linux EC2 Instance and play around there – obviously, you can’t develop effectively with EC2.
$ pip3 install metaflow==2.0.1

$ metaflow
Metaflow (2.0.1): More data science, less engineering

http://docs.metaflow.org - Read the documentation
http://chat.metaflow.org - Chat with us
help@metaflow.org        - Get help by email

Commands:
  metaflow tutorials  Browse and access metaflow tutorials.
  metaflow configure  Configure metaflow to access the cloud.
  metaflow status     Display the current working tree.
  metaflow help       Show all available commands to run.

$ metaflow tutorials pull
Metaflow (2.0.1)

Pulling episode "00-helloworld" into your current working directory.
Pulling episode "01-playlist" into your current working directory.
Pulling episode "02-statistics" into your current working directory.
Pulling episode "03-playlist-redux" into your current working directory.
Pulling episode "04-playlist-plus" into your current working directory.
Pulling episode "05-helloaws" into your current working directory.
Pulling episode "06-statistics-redux" into your current working directory.
Pulling episode "07-worldview" into your current working directory.

To know more about an episode, type:
metaflow tutorials info [EPISODE]

$ cd metaflow-tutorials/00-helloworld
That’s it. MetaFlow has a fancy CLI and no UI (to my knowledge). Compared to MLFlow, Metaflow has a more granular process control. For example, you can track and manage every single method in your Python code. They are so called steps in MetaFlow and they (python methods – metaflow steps) are controlled via Python decorators. The file „helloworld.py“ file contains a so called „Flow“ (Collection of „steps“ or python methods).
$ python3 helloworld.py show
Metaflow 2.0.1 executing HelloFlow for user:ubuntu

A flow where Metaflow prints 'Hi'.

Run this flow to validate that Metaflow is installed correctly.

Step start
    This is the 'start' step. All flows must have a step named 'start' that
    is the first step in the flow.
    => hello

Step hello
    A step for metaflow to introduce itself.
    => end

Step end
    This is the 'end' step. All flows must have an 'end' step, which is the
    last step in the flow.

$ python3 helloworld.py run
Metaflow 2.0.1 executing HelloFlow for user:ubuntu
Validating your flow...
    The graph looks good!
Running pylint...
    Pylint not found, so extra checks are disabled.
Creating local datastore in current directory (/home/ubuntu/metaflow-tutorials/00-helloworld/.metaflow)
2020-01-30 14:50:52.288 Workflow starting (run-id 1580395852284119):
2020-01-30 14:50:52.291 [1580395852284119/start/1 (pid 18456)] Task is starting.
2020-01-30 14:50:52.660 [1580395852284119/start/1 (pid 18456)] HelloFlow is starting.
2020-01-30 14:50:52.691 [1580395852284119/start/1 (pid 18456)] Task finished successfully.
2020-01-30 14:50:52.695 [1580395852284119/hello/2 (pid 18462)] Task is starting.
2020-01-30 14:50:53.068 [1580395852284119/hello/2 (pid 18462)] Metaflow says: Hi!
2020-01-30 14:50:53.101 [1580395852284119/hello/2 (pid 18462)] Task finished successfully.
2020-01-30 14:50:53.105 [1580395852284119/end/3 (pid 18468)] Task is starting.
2020-01-30 14:50:53.478 [1580395852284119/end/3 (pid 18468)] HelloFlow is all done.
2020-01-30 14:50:53.511 [1580395852284119/end/3 (pid 18468)] Task finished successfully.
2020-01-30 14:50:53.512 Done!
You see a pretty verbose logging over what step (method) is being executed. Every single Step like „start“, „hello“ and „end“ corresponds to a python method inside the „helloworld.py“ file.
Conclusion – MLFlow vs. Metaflow
Short version: go with MLFlow!
And here is why: Metaflow lacks an overview or a UI that will make this metadata, logging & tracking more accessible to us developers. Also the easy comparison between flows or models isn’t there. Metaflow seems to be highly intertwined with AWS (Sagemaker), which is great.
Compared to a framework that integrates also with Google Cloud, MS Azure, etc. – not so great. The concept of steps gives you a granular control over your Project. Also, you can define python dependencies on method level – meaning that every step could have it’s own versions of libraries – which is awesome.
The Framework MLFlow tops with the less intrusive structure – it doesn’t try gain control over your methods with decorators. It has a useful UI and integrations to many Cloud providers.
This tutorial will briefly discuss the benefits of serving a trained Machine Learning Model with an API. Then we will take a look at a precise example using a Keras Model and Python Flask to serve the model. You’ll learn how to Serve Keras Model with Flask REST API.
Why serve ML Model with API?
Flexibility
Encapsulation the execution and manipulation of your machine learning model with an API has a few benefits. Of the benefit is the abstraction layer that you create with an (REST) API. This abstraction layer enables you to
test your application more easily (with tools that can send API Requests but cannot import your Tensorflow/PyTorch model directly
develop your application (you can initiate an execution with a REST Plugin, with your Browser or in CLI with curl
share functionality as a service (by deploying and making accessible via HTTPS; deploying it as a micro-service)
Mobility
Since your Model now be tweaked with pure HTTP Requests, you can deploy your Model and access/manage it via Requests. No need to login into the SSH to change a cronjob, to change a limit of SQL Query or initiate a new build to deploy a newer version.
Also, with REST API you can deploy your model easily to services like AWS ElasticBeanstalk, Google AppEngine, etc. They all need a working Server in order to deploy your app. And now you can call your Model an Application, because in fact, it is.
Serving Keras Model with Flask
The following Application Structure and Code are just one of the many possibilities how tackle this idea. If you don’t like it, you can check out the CookieCutter Template for more structure and MetaFlow for a whole complete framework.
Folder Structure
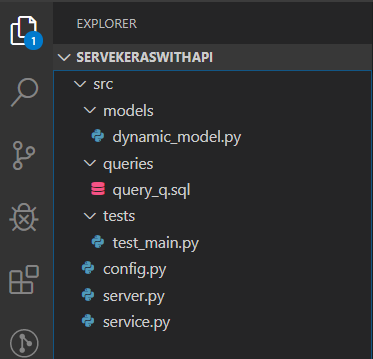
We need following folders to encapsulate the scripts, classes etc.
In the screenshot below you can see that we have a folder with different models (model_x.py). We need this separation because you could have multiple Machine Learning Models that need to be served by the same Flask Server. Optionally you can create a ML Model Loader Class that will create Machine Learning Model based a configuration file (e.g saved in yaml, json or database).
Minimal Folder Structure for a ML Model serving Application in Python.
In the queries folder you store your (in most cases very long) SQL Queries. You replace certain options with {parameter_x}, e.g: LIMIT {limit}. This way you’ll be able to dynamically generate parameterized SQL Queries reading the .sql File:
sql_file.read().format(limit=10000)
Tests/ are for tests. We are going to skip this due to scope.
Config.py is for Configurations (SQL Creds, Server Envs, etc.). We are going to skip this due to scope.
Server.py is for Flask serving our Services.
Our Services do certain actions with our model. For example: „train_service“ would initiate a training process for a certain model. „prediction_service“ would initiate a prediction process for a model and so on.
Machine Learning Model Class
In the code section below you can see a simple DynamicModel class with only one method which return the the compiled Keras Model. This Model does not have to be static and can be outsourced into a „build_model()“ method or similar. Also, all the parameters in the layers like the input_shape should be set via the method parameters from model(). Since this is only an introductory tutorial, many useful methods are missing in this class.
from keras.datasets import mnist
from keras.models import Sequential
from keras.layers import Dense, Dropout, Flatten
from keras.layers import Conv2D, MaxPooling2D
from keras import backend as K
import keras

"""
Author: Andrey Bulezyuk @ German IT Academy (git-academy.com)
Date: 18.01.2020
"""

class DynamicModel():
    def __init__(self, model_name = None):
        self.model_name = model_name

    def model(self):
        model = Sequential()
        model.add(Conv2D(32, (5, 5), input_shape=(28, 28, 1), activation='relu'))
        model.add(MaxPooling2D())
        model.add(Dropout(0.2))
        model.add(Flatten())
        model.add(Dense(128, activation='relu'))
        model.add(Dense(10, activation='softmax'))

        model.compile(loss=keras.losses.categorical_crossentropy,
                    optimizer=keras.optimizers.Adadelta(),
                    metrics=['accuracy'])
        return model
Service Layer
Why do we need a service layer between Flask API (server.py) and the Machine Learning Model (dynamic_model.py)? Simple. By having this extra layer (service.py) you can execute the services (in our case Class Methods) not only via REST API, but also from within other python modules.
Our service layer is responsible for importing the DynamicModel Class, loading and saving the trained model for prediction or training respectively.
import sys, os, datetime
sys.path.insert(1, os.path.join(os.getcwd(), "src/models"))
from dynamic_model import DynamicModel
from keras.datasets import mnist
from keras.utils import np_utils
from keras.models import load_model

"""
Author: Andrey Bulezyuk @ German IT Academy (https://git-academy.com)
Date: 18.01.2020
"""

class Service():

    # model_name must be supplied.
    # otherwise no configuration cad be loaded.
    def __init__(self, model_name=None):
        self.model_name = model_name
        self.dynamic_model = DynamicModel(self.model_name)

    def _get_train_data(self):
        (x_train, y_train), (x_test, y_test) = mnist.load_data()
        # reshape to be [samples][width][height][channels]
        x_train = x_train.reshape((x_train.shape[0], 28, 28, 1)).astype('float32')
        x_test = x_test.reshape((x_test.shape[0], 28, 28, 1)).astype('float32')

        y_train = np_utils.to_categorical(y_train)
        y_test = np_utils.to_categorical(y_test)

        self.x_train = x_train
        self.x_test = x_test

        self.y_train = y_train
        self.y_test = y_test

    def train(self):
        # Load data
        self._get_train_data()

        # This return the compiled Keras Model from dynamic_model->model()
        print(self.y_train)
        model = self.dynamic_model.model()
        model.fit(self.x_train, self.y_train,
            batch_size=1000,
            epochs=4,
            verbose=1)

        # Save trained model
        now = datetime.datetime.now()
        model.save(f"src/models/{self.model_name}_{now.year}{now.month}{now.day}_{now.hour}{now.minute}.h5")
        return True


    def predict(self, X):
        # Load model
        model = self._load_model()

        # Execute
        results = model.predict(X)
        if results is not None and results != False:
            return results
        return False
The train method works perfectly fine. You can see this in the section below when we execute it via Flask REST API with curl. The predict service method is not functional yet. The code and explanation for this is outside of the scope of this tutorial. Keep checking our IT Course Shop for similar courses with more in-depth material.
Flask API Server
Our server part is pretty simple. We import flask and our Service class. We create a route called ’service‘ with two parameters: service_name (which can be train, predict, stop, status, history, …) and model_name. Based on the parameters we execute the specified service.
import sys, os, json
sys.path.insert(1, os.getcwd())
sys.path.insert(1, os.path.join(os.getcwd(), "src"))
from flask import Flask, request
from service import Service

"""
Author: Andrey Bulezyuk @ German IT Academy (https://git-academy.com)
Date: 18.01.2020
"""

application = Flask(__name__)

@application.route("/")
def hello():
    return "Hello World!"


@application.route("/<string:service_name>/<string:model_name>", methods=["GET", "POST"])
def service(service_name=None, model_name=None):
    service = Service(model_name=model_name)

    # GET Request is enough to trigger a training process
    if service_name == 'train':
        service.train()
    # POST Request is required to get the X data for prediction process
    elif service_name == 'predict':
        service.predict()

    return f"Service: {service_name}. Model: {model_name}. Success."

if __name__ == "__main__":
    application.run(debug=True)
That’s it with our short tutorial. If you liked it, subscribe to our Newsletter for more Tutorials. If you have any Questions feel free to contact us or leave a comment.
Manage Cookie Consent
We use cookies to make our website work.
Functional cookies
Immer aktiv
The technical storage or access is strictly necessary for the legitimate purpose of enabling the use of a specific service explicitly requested by the subscriber or user, or for the sole purpose of carrying out the transmission of a communication over an electronic communications network.
Preferences
The technical storage or access is necessary for the legitimate purpose of storing preferences that are not requested by the subscriber or user.
Statistics
The technical storage or access that is used exclusively for statistical purposes.The technical storage or access that is used exclusively for anonymous statistical purposes. Without a subpoena, voluntary compliance on the part of your Internet Service Provider, or additional records from a third party, information stored or retrieved for this purpose alone cannot usually be used to identify you.
Marketing
The technical storage or access is required to create user profiles to send advertising, or to track the user on a website or across several websites for similar marketing purposes.