Here we go again, another VueJS Practice. This time we’ll discuss a very important part of every VueJS Application – the Central Data Store or Vuex Store. Vuex is a VueJS Plugin and extends your Application with centrally available Data and Methods.
Another VueJS Tutorail and Practice by German IT Academy.
Problem / Task
We want to create a Part that is centrally available in our Application: A Shopping Cart. Generate three products in the Vuex Store as states. Create a ProductList.vue View and a ShoppingCart.vue Component. The ProductList.vue should display the products stored in vuex – include a button „Add to Cart“. „Add to Cart“ should add the selected Product to a centrally available list, so that the cart list can be access from any other Component. In that view, import ShoppingCart.vue, which should display all Items in the Cart.
Hint
For the products: use an Array or Object in Vuex.
Displaying multiple UI elements can be done with v-for directive.
Centrally available list is nothing else than a list of centrally avaiable products.
In order to follow the best practices, consider using
Vuex Getters to retrieve data
Vuex Actions to modify Vuex States from the outside (e.g. VueComponent)
Below you can see the visual result of the above code. If you are interested in more VueJS Practice, examples and tutorials, feel free to enroll in our VueJS Course and get certified by German IT Academy.
In the store.js we specify out getters. Our products and cart are just lists in the vuex states object. When we press on „Add to Cart“, we initiate a Vuex Action called „Add to Cart“ with „this.$store.dispatch(‚addToCart‘, id)„. The ShoppingCart.vue simply iterates over the Vuex State Cart and prints out the items.
It’d be better to outsource the v-for loop in ProductList.vue into another Vue-Component ProductItem.vue. ProductList.vue would import ProductItem.vue as a child, and pass a product id. Then, ProductItem.vue could display the product by selecting it via id.
Wecome to the third VueJS Practice from German IT Academy. In this module we are going to make sure that we understand the properties and the life cycle of a Vue-Component (or instance).
Problem
Create a Component ProductDetail.vue with
a product object with random values for keys (id, price, name)
a text input-field „quantity“ with default value „0“
a text output calculating the total Costs (product price * quantity)
The Component must have following behavior:
Before the Component has been mounted, a text output „Specify Quantity.“ appears .
Data property „quantity“ is automatically updated with the input-field quantity.
After Quantity has been updated, a text output „Quantity updated.“ appears.
Hint
For the text above all Content: think about a data property that will be changed on certain Component life cycles.
Regarding the quantity and input-field: Do you remember what v-model is good for?
For the behavior part: the words „before“ and „after“ should be ringing a bell in your head. Take a look at the life cycle diagram of VueJS Components/Instances.
Solution
Let’s jump right into the code. Read it and see if you understand everything. If not, see the explanation after the code.
Starting with unimportant: styles are just css styles. The {{notification}} in <template> can be either „Please specify quantity“ or „Quantity updated!“. The value of this data property changes with the life cycle hooks beforeMount() and updated(). The computed totalValue is an automatic way recalculate a value as soon as a data property (in our case quantity) changes. And then there are the data properties like products with dummy data. The input-field is mapped with quantity data property thanks to v-model.
This is how our result looks like. Simplistic and solves the Task/Problem at hand.
We hope you liked our VueJS Practice and learned something new. If you want to get a deeper insight into how VueJS works, consider enrolling in our VueJS Certificate Junior Course.
In VueJS 2 Practice we will explore a possible solution to a simple Problem: How to structure your Project, Folders, Assets and Single File Components?
Task
Create a VueJS Project/Folder Structure, that will contain Components for Detail views of products, users and payment steps. It’ll also contain a file with vuex state definitions. The project will also include API fetching methods, that should be accessible from every Single File Component.
Hints
Take a look at the official recommendation for VueJS Project Structure.
The API fetching methods need to be centrally available. What else is centrally available in your App?
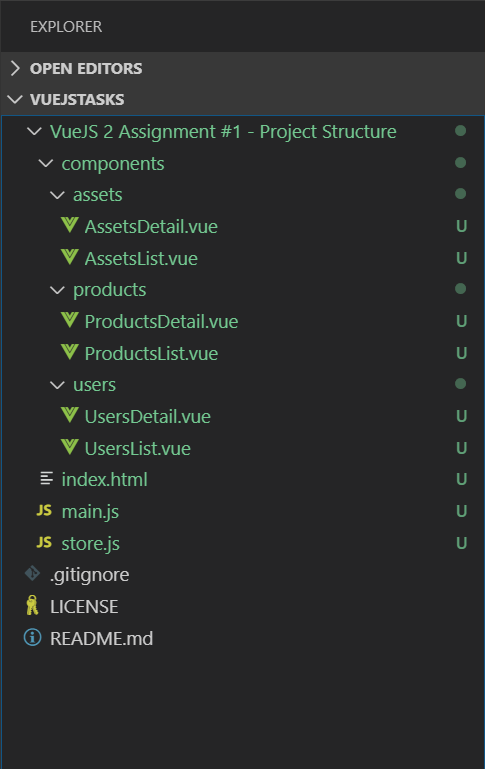
Your Project Structure would look like the one presented in the screenshot.
You have two VueJS Components „*Detail.vue“ and „*List.vue“ for each products, assets and users.
Your vuex state definitions are obviously in the „vuex-“ store.js file.
The hardest one was probably the placement of the API fetching methods. There is no right answer, but there is my answer that worked for me many times. Since your methods need to be available centrally, the vuex Store-Object in store.js is the perfect place for it. You combine the actions method in store.js Store-Object with your API fetching methods.
Then you can call from every part of your Application the following line and execute your method. The best part of this structure is that you can directly insert your freshly fetched data into the Vuex Store.
this.$store.dispatch('getUsers')
And that is how you solve this VueJS 2 Practice . If you love VueJS like we do, please consider enrolling in our VueJS Certificate Course. It’s on-demand with lifetime access!
Andrey Bulezyuk is the founder of German IT Academy and a course creator. He mainly covers topics from Web Development (NodeJS, VueJS, Django etc.) to Data Science (Pandas, Numpy) and Machine Learning (Tensorflow, Keras, etc.).
He published a German book „Algorithmic Trading„, giving his readers the opportunity to learn how to code automatic trading systems for the stock market or the Forex.
He has experience as a Backend and Frontend Developer. In his early years he worked on Web Projects as a Freelancer. Switched later to Financial Market System Developing. Currently employed as Machine Learning Engineer.
He takes part in different projects and acts as a Co-Founder in different small start-ups. Andrey Bulezyuk was an employed Full-Stack Developer in Munich. Currently his duties do cover areas of Machine Learning and ETL.
Do you have a VueJS App or do you want to build a Vue App and you want to have a nice Material Design?
WHAT IS MATERIAL DESIGN?
Material design is a guideline with predefined rules. Both describe how your application should look like in order to make your application look consistent and usable across all parts and devices.
HOW TO USE MATERIAL WITH VUEJS?
In order to implement Material Design in your VueJS Application you could create your own Components and style them according to the Material Principles.
We are going to explore the usage of third party tools inside our Vue App.
If your project cannot be used with vue-cli3, then go with „$ npm install vuetify„
HOW TO BECOME A VUE.JS DEVELOPER?
We’ve got something for you. Check out the VueJS Junior Course. In this online course you will dive deep into how Components work and how you can quickly create a Vue.js Website.
ACTIVATION IN VUE SOURCE CODE
You have first import Vuetify in main.js. Then you tell your Vue App to use the freshly imported Vuetify.
USAGE OF VUETIFY COMPONENTS
Now that you have Vuetify in your Application, you can go ahead and start using all the Components that this big framework offers you. Where to begin? Start with the official library of all available Components (https://vuetifyjs.com/en/components/api-explorer).
Let’s use a simple Component called „Carousel“: <v-carousel>.
When you save this Component and open it in the browser, you should see something like this:
Manage Cookie Consent
We use cookies to make our website work.
Functional cookies
Immer aktiv
The technical storage or access is strictly necessary for the legitimate purpose of enabling the use of a specific service explicitly requested by the subscriber or user, or for the sole purpose of carrying out the transmission of a communication over an electronic communications network.
Preferences
The technical storage or access is necessary for the legitimate purpose of storing preferences that are not requested by the subscriber or user.
Statistics
The technical storage or access that is used exclusively for statistical purposes.The technical storage or access that is used exclusively for anonymous statistical purposes. Without a subpoena, voluntary compliance on the part of your Internet Service Provider, or additional records from a third party, information stored or retrieved for this purpose alone cannot usually be used to identify you.
Marketing
The technical storage or access is required to create user profiles to send advertising, or to track the user on a website or across several websites for similar marketing purposes.