Here we go again, another VueJS Practice. This time we’ll discuss a very important part of every VueJS Application – the Central Data Store or Vuex Store. Vuex is a VueJS Plugin and extends your Application with centrally available Data and Methods.
Another VueJS Tutorail and Practice by German IT Academy.
Problem / Task
We want to create a Part that is centrally available in our Application: A Shopping Cart. Generate three products in the Vuex Store as states. Create a ProductList.vue View and a ShoppingCart.vue Component. The ProductList.vue should display the products stored in vuex – include a button „Add to Cart“. „Add to Cart“ should add the selected Product to a centrally available list, so that the cart list can be access from any other Component. In that view, import ShoppingCart.vue, which should display all Items in the Cart.
Hint
For the products: use an Array or Object in Vuex.
Displaying multiple UI elements can be done with v-for directive.
Centrally available list is nothing else than a list of centrally avaiable products.
In order to follow the best practices, consider using
Vuex Getters to retrieve data
Vuex Actions to modify Vuex States from the outside (e.g. VueComponent)
Below you can see the visual result of the above code. If you are interested in more VueJS Practice, examples and tutorials, feel free to enroll in our VueJS Course and get certified by German IT Academy.
In the store.js we specify out getters. Our products and cart are just lists in the vuex states object. When we press on „Add to Cart“, we initiate a Vuex Action called „Add to Cart“ with „this.$store.dispatch(‚addToCart‘, id)„. The ShoppingCart.vue simply iterates over the Vuex State Cart and prints out the items.
It’d be better to outsource the v-for loop in ProductList.vue into another Vue-Component ProductItem.vue. ProductList.vue would import ProductItem.vue as a child, and pass a product id. Then, ProductItem.vue could display the product by selecting it via id.
Wecome to the third VueJS Practice from German IT Academy. In this module we are going to make sure that we understand the properties and the life cycle of a Vue-Component (or instance).
Problem
Create a Component ProductDetail.vue with
a product object with random values for keys (id, price, name)
a text input-field „quantity“ with default value „0“
a text output calculating the total Costs (product price * quantity)
The Component must have following behavior:
Before the Component has been mounted, a text output „Specify Quantity.“ appears .
Data property „quantity“ is automatically updated with the input-field quantity.
After Quantity has been updated, a text output „Quantity updated.“ appears.
Hint
For the text above all Content: think about a data property that will be changed on certain Component life cycles.
Regarding the quantity and input-field: Do you remember what v-model is good for?
For the behavior part: the words „before“ and „after“ should be ringing a bell in your head. Take a look at the life cycle diagram of VueJS Components/Instances.
Solution
Let’s jump right into the code. Read it and see if you understand everything. If not, see the explanation after the code.
Starting with unimportant: styles are just css styles. The {{notification}} in <template> can be either „Please specify quantity“ or „Quantity updated!“. The value of this data property changes with the life cycle hooks beforeMount() and updated(). The computed totalValue is an automatic way recalculate a value as soon as a data property (in our case quantity) changes. And then there are the data properties like products with dummy data. The input-field is mapped with quantity data property thanks to v-model.
This is how our result looks like. Simplistic and solves the Task/Problem at hand.
We hope you liked our VueJS Practice and learned something new. If you want to get a deeper insight into how VueJS works, consider enrolling in our VueJS Certificate Junior Course.
Learning by doing – VueJS Practice part 2. Let’s take a look at how a possible school-like question on your VueJS Test would look like. And how you would go about solving it. Btw if you want to dive deep into VueJS 2, take a look at our VueJS Certificate Course.
Problem
You need to create routes for the Vue-Components that we created in the previous VueJS Practice. Create a vue-route (use Vue-Router) for each of the following Components:
AssetsDetail.vue and AssetsList.vue
ProductsDetail.vue and ProductsList.vue
UsersDetail.vue and UsersList.vue
Routes for „*Detail.vue“ Components must have a url parameter „id“. Router for „*List.vue“ Components must have a url parameter „page“. Also, create a Vue Component called „navigation/TopMenu.vue“ where you generate a list of router-links to the previously created routes; use a programmatic approach.
Hint
Vue-Router is the obvious choice for a simple routing task like this.
Regarding URL Parameters you cheat by reading about Dynamic Routing at Vue-Router Official Docs.
VueJS Practice – Solution
To define your router with Vue-Router, you need to write your routings to router.js. Here is how our prototype looks like.
The TopMenu.vue Component has two benefits. First, it helps you debug your router.js while you are creating your routes configuration. Second, you can import the TopMenu to the most Upper VueComponent. This ways, if a route changes, your will have adjust the TopMenu.vue only, and the whole App will be updated. This is what i came up with for the Menu.
In VueJS 2 Practice we will explore a possible solution to a simple Problem: How to structure your Project, Folders, Assets and Single File Components?
Task
Create a VueJS Project/Folder Structure, that will contain Components for Detail views of products, users and payment steps. It’ll also contain a file with vuex state definitions. The project will also include API fetching methods, that should be accessible from every Single File Component.
Hints
Take a look at the official recommendation for VueJS Project Structure.
The API fetching methods need to be centrally available. What else is centrally available in your App?
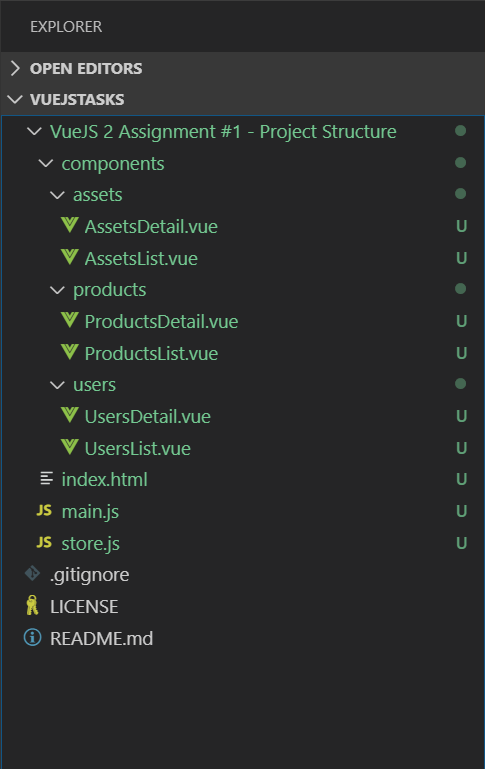
Your Project Structure would look like the one presented in the screenshot.
You have two VueJS Components „*Detail.vue“ and „*List.vue“ for each products, assets and users.
Your vuex state definitions are obviously in the „vuex-“ store.js file.
The hardest one was probably the placement of the API fetching methods. There is no right answer, but there is my answer that worked for me many times. Since your methods need to be available centrally, the vuex Store-Object in store.js is the perfect place for it. You combine the actions method in store.js Store-Object with your API fetching methods.
Then you can call from every part of your Application the following line and execute your method. The best part of this structure is that you can directly insert your freshly fetched data into the Vuex Store.
this.$store.dispatch('getUsers')
And that is how you solve this VueJS 2 Practice . If you love VueJS like we do, please consider enrolling in our VueJS Certificate Course. It’s on-demand with lifetime access!
Among all JavaScript frameworks, one has been particularly gaining popularity in recent years: Vuejs. A Soft learning curve, Virtual DOM and many other features make Vuejs unique and useful. Vuejs is a JavaScript framework for building user interfaces but it doesn’t provide actual UI elements or components we can use. Frameworks help designers and developers to focus on the features which they want to add for their projects rather than focusing on reinventing the coding. That’s why many UI frameworks have been built to provide users with reusable and styled-components. Here, we will discuss the top three UI frameworks that can be used with Vuejs.
Vuetify
Vuetify is a material design component framework that lets you create clean and reusable UI components. It works with Vue’s Server Side Rendering and has premium themes. Vuetify has great support and continuous updates which helps users to remain up to date. Steps to install Vuetify are given below:-
First, you need to upgrade to Vue CLI 3 or above using the following command:
Then create a new Vue.js project using Vue CLI 3:
Make sure that you select all the things you need for the project by manually selecting the features. The above picture shows a sample of what you can start with and the name of the app.
After you have instantiated the project, add the Vuetify package.
Choose the
default preset and you are good to go.
Quasar
Quasar is an MIT-licensed and simple to use UI framework that can be used to build front-end apps. It provides a color palette with a variety of colors in it and other form features like slider, checkbox, etc which makes it very useful. Below are the installation steps for Quasar:-
First, check the version of npm and node (node>=8 and npm>=5) by using below commands:
Then we will install the Quasar CLI:
Now we can create a project folder with Quasar
CLI.
And start working on a project.
Element
Element is a UI component library that has versions for React, Angular, and Vuejs. The Popularity of element speaks for itself with more than 40k stars on Github. The wide variety of components which Element provide, makes it one of the top three UI framework or library used for Vuejs. Steps to install Element is very simple, just run the following command:-
Now you can import and use it as follows:-
There are many other UI frameworks and libraries that can be used with Vuejs like Fish-UI, Buefy, Vux, AT-UI, etc. but these three provide many components as compared to others and their popularity will increase in the near future.
The technical storage or access is strictly necessary for the legitimate purpose of enabling the use of a specific service explicitly requested by the subscriber or user, or for the sole purpose of carrying out the transmission of a communication over an electronic communications network.
Preferences
The technical storage or access is necessary for the legitimate purpose of storing preferences that are not requested by the subscriber or user.
Statistics
The technical storage or access that is used exclusively for statistical purposes.The technical storage or access that is used exclusively for anonymous statistical purposes. Without a subpoena, voluntary compliance on the part of your Internet Service Provider, or additional records from a third party, information stored or retrieved for this purpose alone cannot usually be used to identify you.
Marketing
The technical storage or access is required to create user profiles to send advertising, or to track the user on a website or across several websites for similar marketing purposes.